

Home & Decor Blogs: DIY, Interior Design & Lifestyle Ideas
Why Most Paver Sealing Jobs Fail Within Two Years — And What to Demand From the Contractor
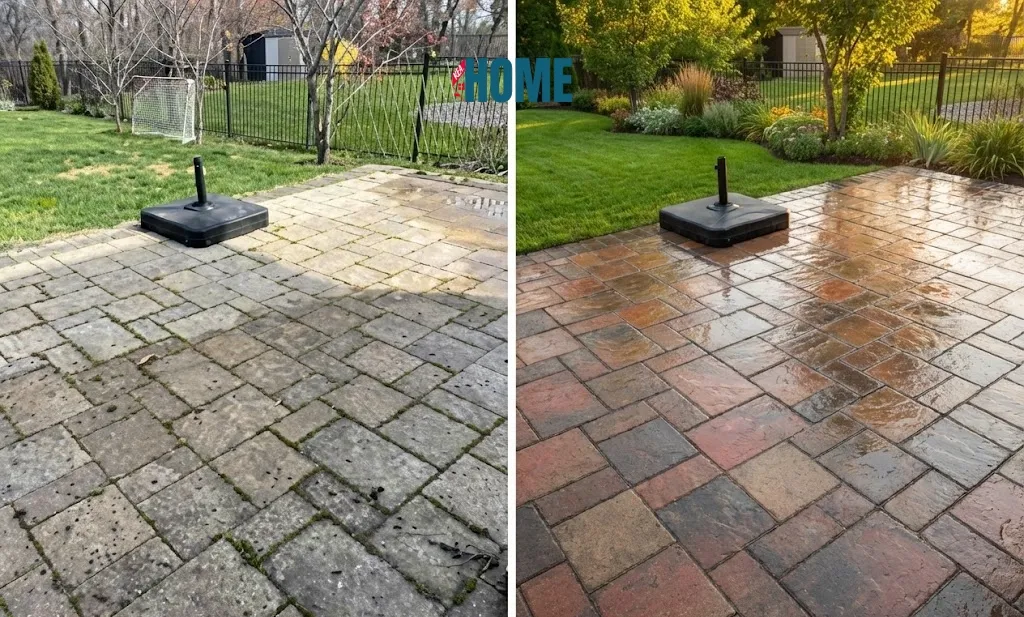
A freshly sealed driveway looks incredible for about six months. Then the cheap jobs start to go. Edges peel. A milky haze creeps across the surface where moisture got trapped underneath. The wet-look that the homeowner paid extra for fades to a chalky matte. Joints loosen because the sand inside them was never restored. By year two, the work has to be redone — sometimes from scratch, sometimes with a stripping job first.
None of that has to happen. Paver sealing is a real trade with real chemistry behind it, and the difference between a job that lasts five to seven years and one that fails in eighteen months comes down to a handful of variables most homeowners are never told to ask about. Sealer type. Surface prep. Joint sand. Cure time. Climate match.
Here is what actually matters, and what to push back on when the quote arrives.

1. The Sealer Type Decides Almost Everything
There is no universal paver sealer. The product matched to a Florida pool deck is the wrong product for a Minnesota driveway, and the product that works on concrete pavers can damage natural stone. Most failed jobs trace back to this single decision being made carelessly.
Broadly, sealers fall into two families: film-forming (which sit on top of the paver and create a visible coating) and penetrating (which soak in and react with the stone, leaving the surface looking natural).
| Sealer Type | How It Works | Best For | Watch Out For |
|---|---|---|---|
| Acrylic (film-forming) | Forms a thin protective film on top of the paver. Available water- or solvent-based. | Concrete pavers, decorative finishes, wet-look or gloss results | Peeling and hazing when applied to damp pavers; UV yellowing on cheaper grades |
| Polyurethane (film-forming) | Builds a thicker, more chemical-resistant film than acrylic. Often two-part. | High-traffic driveways, pool decks, surfaces that see oil or chemicals | Cost is higher; trapped moisture causes worse failure than acrylic if prep is wrong |
| Silane-Siloxane (penetrating) | Tiny molecules soak in and chemically bond inside the pores. Invisible finish. | Natural stone, brick pavers, cold climates with freeze-thaw cycles | No colour enhancement; the paver looks the same as before, only protected |
| Acrylic hybrid | Penetrates like a silane-siloxane but contains some acrylic resin for mild darkening | Homeowners who want some colour pop without a glossy film | Less colour enhancement than full acrylic; not a true high-gloss option |
The climate match nobody mentions
In cold climates with serious freeze-thaw, silane or silane-siloxane blends generally hold up better because they let the paver breathe. Trapped moisture under a thick film sealer is what causes spalling in winter. In warm climates, acrylic and silane-siloxane both perform well — acrylic if the homeowner wants the wet-look, silane-siloxane if they want invisible protection.
The contrarian point
Not every paver needs sealing. Some natural stones — certain travertines, denser slates, polished granites — can be discoloured or damaged by film-forming sealers. If a contractor recommends sealing every paver type the same way, walk away. Ask which sealer they would use on this specific stone and why.
2. The Prep Is Where the Job Lives or Dies
If only one section of this guide gets read, it should be this one. The single biggest predictor of a paver sealing job lasting is whether the surface was properly prepared before the sealant touched it. A great sealer applied over poor prep will fail. A modest sealer applied over excellent prep will outlast it.
Pressure washing — the PSI matters
Most contractors pressure wash. Not all of them do it right. Concrete pavers should generally be cleaned under 2,500 PSI; brick and natural stone often need less. Too low, and embedded dirt and biofilm remain in the pores, which the sealer then locks in for the next five years. Too high, and the surface itself pits, especially on softer pavers.
What proper prep includes
- Pressure washing at the right pressure for the paver type
- Targeted chemical cleaning for grease, oil, rust, or efflorescence (those white salt deposits)
- Full removal of weeds, moss, and lichen, root and all
- A drying window long enough for the paver itself to be dry, not just the surface — usually 24 to 48 hours minimum, longer after deep cleaning
Sealing a damp paver is the single most common cause of the milky white haze that ruins driveways. Trapped water cannot evaporate through the new film, so it stays under the coating and shows up as a cloud. Once that happens, the only fix is stripping the sealer off and starting over.
3. Joint Sand: The Step That Separates a Real Job From a Cosmetic One
Pavers move. The joints between them are not placed under a dramatic amount of stress each time they freeze, each time it rains heavily, and each time a truck rolls down the driveway. It’s the sand in those joints that holds the entire surface together. The pavers begin to move as the sand melts, water works its way under the pavers, and the bottom upstakes the pavers.
The first step of a real sealing job is to restore the joints. Where polymeric sand comes in, a mixture of fine sand and dry binder agents that, with water, produce a flexible, weed-preventing bond. These binders are designed as adhesive applications specifically for the outdoor hardscape industry where they act to bind the sand grains together to create one piece of a single elastic strip rather than loose granules. The effect is a joint that is weed-proof, ant-proof, washout resistant and allows for seasonal movement without cracking.
Polymeric sand vs regular joint sand
- Regular sand washes out of joints with the first hard rain. It is what most builders use because it is cheap and fast, and it is what fails first.
- Polymeric sand stays put for years, blocks most weed germination, and holds the pavers in a stable grid. It costs more, but a single re-sanding cycle covers the difference.
Unfortunately, if the contractor does not refer to the joint sand restoration, this is a red flag. If the joints are not repaired, the sealing is merely cosmetic and the underlying problem persists.
4. The Failure Modes Worth Recognising on Sight
Most homeowners cannot tell whether a sealing job is going well or quietly failing until the damage is obvious. A few visual cues catch problems while they are still fixable.
- White hazing or milky cloudiness. Moisture trapped under a film sealer. Caused by sealing wet pavers or by water rising up through the slab after rain. Requires stripping.
- Peeling edges or flaking patches. Sealer applied to a surface that was not properly cleaned, or applied too thick in one coat. The film loses adhesion and lifts away.
- Yellowing on lighter pavers. Usually a cheap acrylic or solvent-based product reacting to UV. High-grade sealers are non-yellowing; budget ones are not.
- Joints emptying out within a season. The job skipped polymeric sand entirely, or used regular sand to save cost.
- An over-dark, almost wet-looking finish that never seems to dry. Too much sealer applied. Worse, the over-application can hold moisture in and turn into the haze problem above.
5. Cost, Cure, and What a Real Quote Looks Like
Professional paver sealing in most US markets runs roughly $0.50 to $2.00 per square foot, depending on paver type, surface condition, sealer chemistry, and whether joint sand restoration is included. Anything dramatically below that range is either skipping prep, skipping joint work, or using consumer-grade sealer that will fail inside two years.
Cure times worth knowing
- Foot traffic: usually safe after 24 hours
- Vehicle traffic: typically 72 hours minimum
- Full chemical cure: 7 to 14 days, depending on temperature and product
What a real quote should specify
- The exact sealer product and chemistry — brand and type, not just “commercial-grade sealant”
- Pressure washing PSI and the cleaning chemicals used
- Whether polymeric sand is included and replaced, not just topped up
- Drying window between cleaning and application
- Number of coats and the expected coverage rate per gallon
- Warranty terms — what failures are covered and for how long
A one-line price quote with none of that information is not a quote. It is a guess, and the homeowner is the one who pays for it when the work fails.
When Not to Seal (And Other Honest Realities)
There are lots of good reasons to seal at another time. When installing new pavers, make sure they are allowed to sit for 30-90 days after installation to allow efflorescence to dissipate before it is covered with a coating. No sealing pavers in direct hot sun – surface flashes too quickly and solvents are trapped. The weather that the professionals really want is cool, dry, and overcast without rain in the forecast for the next 48 hours. If pavers look wet from dew or any moisture, they should not be sealed until they are dry. And if the surface is already white-hazy, then sealing over it will result in a permanent fix. Any real contractor will be honest enough to tell you this, and advise you to strip first. Believe the one who says “not today” more than the one who paints in the rain.
Much of the technical detail in this guide was informed by working with professional paver sealing services in Cape Coral, Florida, where the climate — intense UV, frequent rain, and high humidity — punishes shortcut work faster than most regions. The principles apply nationwide, but the failure modes show up loudest in the warm, wet markets. A homeowner armed with these questions will outlast the contractors who hoped not to be asked.