

Home & Decor Blogs: DIY, Interior Design & Lifestyle Ideas
Why More Homeowners Are Converting Shipping Containers Into Garden Studios (And What Goes Wrong)
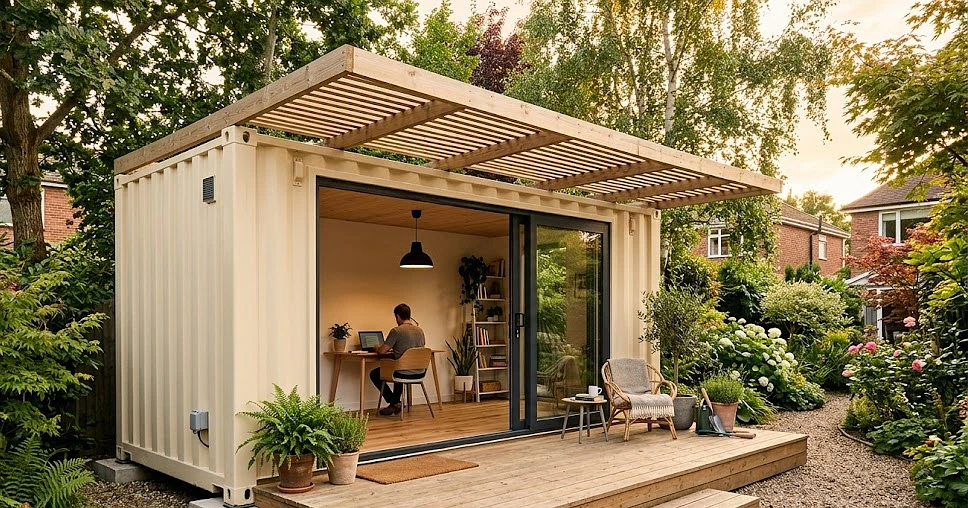
A shipping container garden studio is a repurposed 20ft or 40ft steel freight unit — originally built to carry goods across oceans — converted into a functional backyard workspace, creative studio, or guest room. The conversion typically involves cutting openings for windows and doors, insulating the interior walls, installing electrical wiring, and finishing the space to a livable standard.
The global container homes market hit $68 billion in 2025 and is on track to nearly double by 2034, growing at roughly 7.5% year-on-year. Nearly half of that demand comes from residential buyers — not commercial developers, not governments. Homeowners.
So what’s driving that number? And more importantly, what do those homeowners discover after the container lands in their backyard?
Why Are People Doing This in the First Place?
The short answer: remote work broke the traditional garden office market.
When millions of people shifted to working from home, demand for backyard offices surged. Timber garden rooms jumped in price. Lead times stretched to months. And homeowners started looking at a steel box that could be delivered in days, already structurally sound, already weatherproof — at least on paper.
A standard 20ft used shipping container costs between $1,500 and $3,500 depending on condition and location. A basic garden office conversion — insulation, electrical, a window, a door — can bring total cost to $8,000–$15,000. Compare that to a purpose-built timber garden office starting at $15,000–$25,000 before delivery.
The math made sense. But math doesn’t account for condensation.
The Condensation Problem Nobody Mentions on Pinterest
Steel sweats. That’s the reality Pinterest conversion photos don’t show you.
When warm interior air meets a cold steel wall, moisture condenses on the surface. In a shipping container, this happens on the ceiling, the walls, and especially in the corrugation grooves where water pools and sits. Leave this unaddressed and within six months you’ll have mould behind your freshly installed plasterboard.
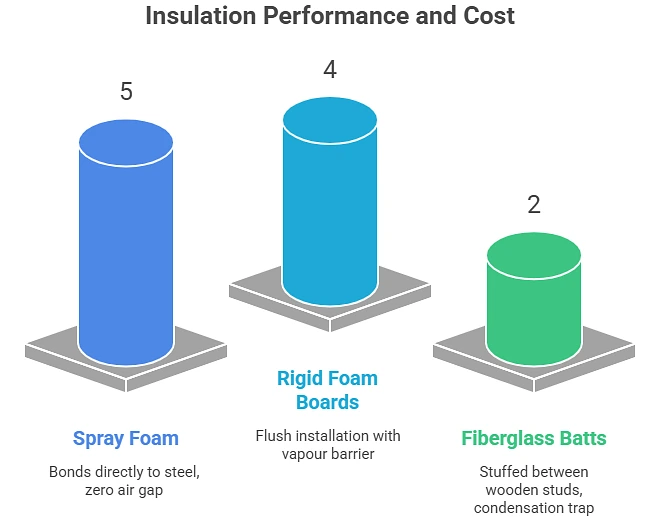
Does insulation fix it? Partially — but only if done correctly. Spray foam insulation works because it bonds directly to the steel, leaving no air gap where condensation can form. Rigid foam boards with a vapour barrier are the budget alternative. What doesn’t work is fiberglass batts stuffed between wooden studs — the gap between the batts and the steel wall becomes a moisture trap.
What about ventilation? Essential. A sealed, insulated container without mechanical ventilation becomes a humidity box within hours of someone working inside it. A basic extraction fan or a small HVAC unit isn’t optional — it’s the difference between a usable studio and a mould problem.
The Floor Issue That Catches People Off Guard
Every shipping container has a plywood floor. That floor has spent years — sometimes a decade — carrying industrial cargo across oceans. It’s been exposed to fumigation chemicals, pest treatments, and moisture cycles that would destroy ordinary timber.
Is it safe to work on? Depends on the container’s history. Containers manufactured before 2010 may contain flooring treated with pesticides that are now restricted in several countries. Newer containers typically use sustainably sourced bamboo or hardwood with less chemical treatment, but “typically” isn’t a guarantee.
What should you actually do? If you’re converting a used container into a space where you’ll spend hours daily, either verify the floor treatment history with the supplier or plan to remove and replace the flooring entirely. A sealed epoxy coating over the existing floor is the middle-ground solution — it encapsulates whatever’s underneath while giving you a clean working surface.
This is where sourcing matters more than price. A supplier who can tell you the manufacturing year, the previous cargo history, and the floor treatment method is worth more than one offering a container $500 cheaper with no documentation. Companies like Shipping Containers Christchurch maintain detailed unit histories and grading systems — Grade A units with clean, structurally sound floors versus Grade B units where cosmetic wear is present but structure remains intact. Knowing exactly what you’re starting with saves you from discovering problems mid-conversion.
What About Council Permits? Do You Actually Need One?
This is where most DIY conversion guides get dangerously vague.
The answer varies enormously by region, but the general principle is this: if the structure is permanent, habitable, or connected to utilities, most local authorities consider it a building and regulate it accordingly. A container sitting in your yard as storage might not need approval. The same container with electrical wiring, insulation, and a window almost certainly does.
Common restrictions people discover too late:
- Height limits. A standard shipping container is 2.6 metres tall (high-cube units are 2.9m). Some residential zones cap accessory buildings at 2.4 metres, which means your container physically cannot comply without excavation.
- Setback rules. Many councils require structures to sit a minimum distance from boundary fences — often 1 to 1.5 metres. This eats into smaller backyards fast.
- Aesthetic requirements. Some areas mandate that accessory buildings match the main dwelling’s exterior. A raw corrugated steel box won’t pass. Cladding it in timber or composite panels adds $2,000–$5,000 and several days of work.
- Duration limits. Certain jurisdictions allow containers temporarily (often 6–12 months) but not permanently. Check before you pour a concrete foundation.
The smart move: Call your local building authority before you buy the container, not after. A 10-minute phone call can save you from a compliance order that forces removal.
The Heat Problem: Steel in Summer
A steel box in direct sunlight becomes an oven. Internal temperatures in an uninsulated container can reach 40–50°C on a moderately warm day. Even with insulation, a container positioned in full sun with no shade strategy will cost significantly more to cool than a timber structure with natural thermal mass.
What actually works:
Orientation matters more than insulation thickness. Position the container so the long walls face north-south (in the Southern Hemisphere) or with the largest glass openings away from direct afternoon sun. A simple shade sail or pergola over the roof reduces internal temperature dramatically — steel absorbs radiant heat, so blocking it before it hits the surface is more effective than trying to insulate against it from inside.
Light-coloured exterior paint reflects more heat than the standard dark grey or green. A white or cream-painted container can run 10–15°C cooler internally than an unpainted one in the same position.
Used vs New: Which Actually Makes Sense for a Garden Studio?
Used containers dominate the market — old and scrap units account for the majority of sales globally because they cost a fraction of new ones. But “used” covers everything from a one-trip unit that crossed the ocean once to a 15-year veteran with dents, surface rust, and questionable door alignment.
For a garden studio specifically, a one-trip container is the sweet spot. It’s technically “used” so it’s priced below new, but it’s only made a single voyage — meaning minimal wear, clean floors, functional doors, and intact paint. Expect to pay 30–50% more than a heavily used unit, but you’ll save that difference in reduced prep work.
When does a heavily used container make sense? When you’re planning to clad the exterior anyway, replace the floor, and cut large openings for windows. At that point, you’re paying for the steel frame, not the finish — and a cheaper unit with good structural bones does the job.
What’s the Realistic Timeline From Purchase to Working Studio?
Most conversion guides suggest “a weekend project.” That’s misleading for anything beyond bolting in a desk and plugging in an extension cord.
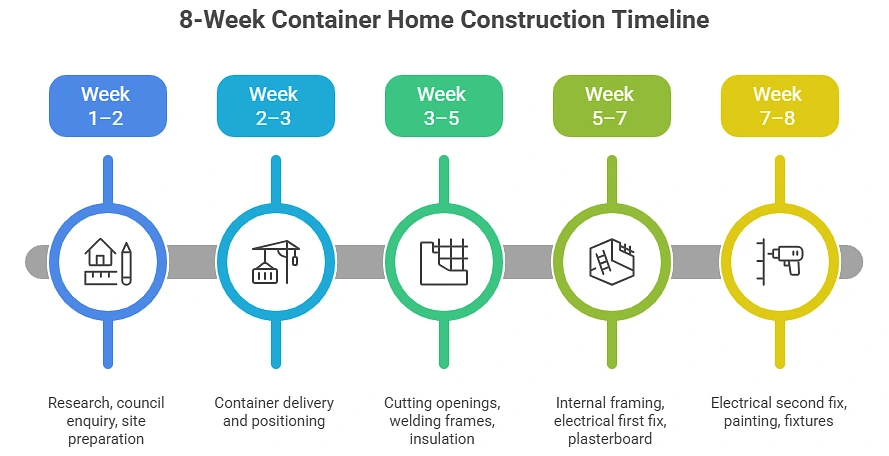
A realistic timeline for a properly insulated, electrically wired, council-compliant garden studio:
Week 1–2: Research, council enquiry, site preparation (levelling ground, laying foundation pads or concrete blocks).
Week 2–3: Container delivery and positioning. This alone requires coordination — the delivery truck needs clear access, and a crane or tilt-tray vehicle needs overhead clearance with no power lines in the way.
Week 3–5: Cutting openings, welding window and door frames, rust treatment on all cut edges, spray foam or rigid board insulation, vapour barrier installation.
Week 5–7: Internal framing, electrical first fix, plasterboard or panelling, flooring.
Week 7–8: Electrical second fix, painting, fixtures, furniture.
Eight weeks. Not a weekend. And that’s assuming you’re doing the non-electrical work yourself and hiring a licensed electrician for the wiring.
Is It Worth It?
For the right person — yes. A container garden studio costs less than a purpose-built alternative, survives weather that would damage a timber structure, and provides a level of security (steel walls, lockable cargo doors) that no garden shed matches. The resale market for converted containers is growing too — a well-finished unit can be craned out and sold if you move.
But it’s not a shortcut. The people who end up happy with their container studios are the ones who treated it like a proper building project — researched the regulations, chose the right container grade, solved the condensation and heat problems before they became expensive, and budgeted for the conversion realistically rather than optimistically.
The ones who end up frustrated are the ones who saw a Pinterest photo and ordered a container the same afternoon.