

Home & Decor Blogs: DIY, Interior Design & Lifestyle Ideas
How to Set Up the Thuma Bed Frame at Home

If you’ve got your eye on the Thuma Bed Frame (or maybe it’s already sitting in boxes in your living room), you’ve come to the right place. This post will walk you through a to getting the frame assembled and ready to sleep on no jargon, no fluff, just what you need. Plus, I compare how this guide goes deeper and fresher than other blogs out there, so you’ll be ahead of the game.
Assembling the Thuma bed frame is designed to be a quick, tool free process (except for a few hand tightened screws for the center support). The assembly relies on a simple, Japanese inspired joinery system.
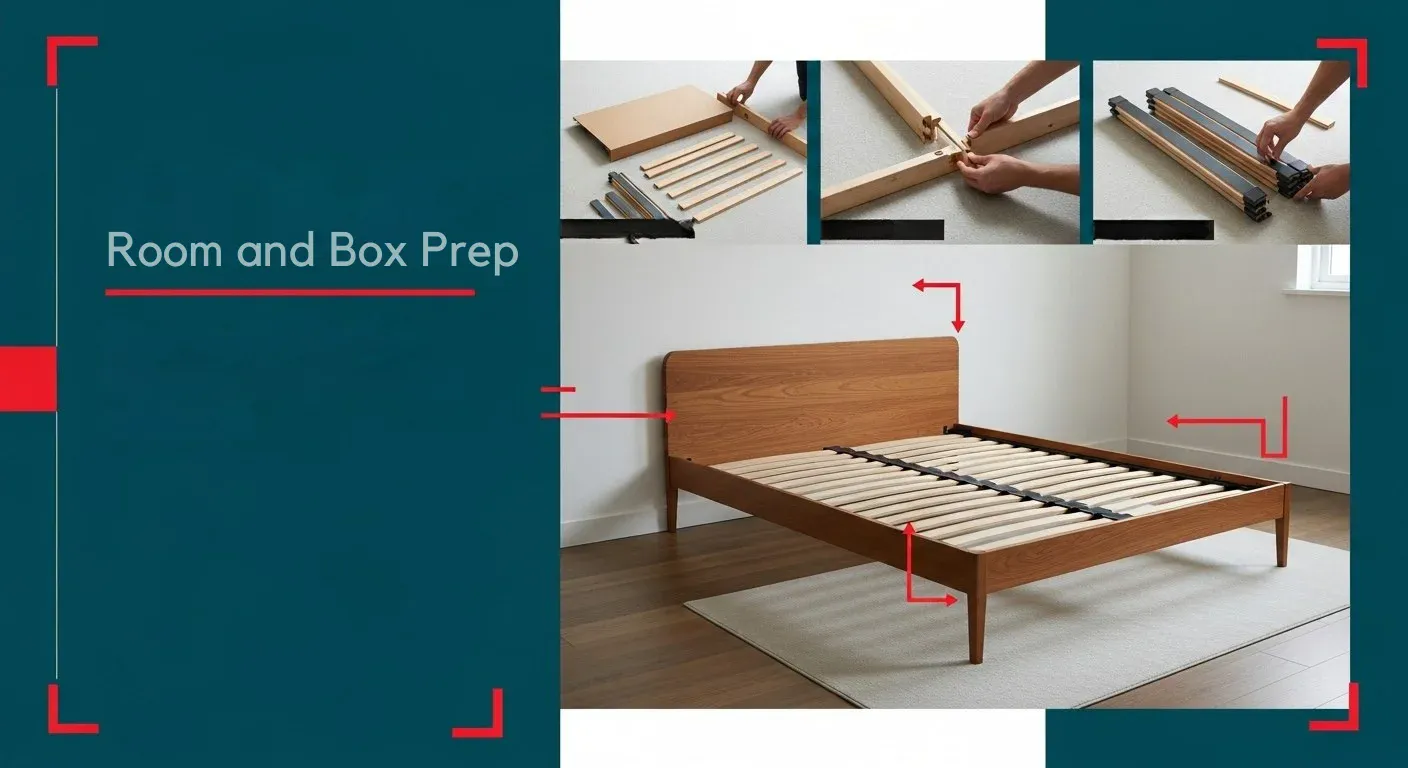
- Unpack and Arrange: Lay out the long side rails and short head/foot rails in the desired location, ensuring the “U” joints are correctly oriented as indicated in the instructions.
- Connect the Frame: Stand up the corner legs and slide the rails into the designated slots, utilizing the unique joint system to create a secure, interlocking frame.
- Install Center Support: Attach the center leg to the center support rail with the provided screws and position it inside the frame, hand-tightening all connections.
- Roll Out Slats: Unroll the felt-lined wooden slats across the frame, fitting the ends between the short rails and the slat stops to ensure a snug fit.
- Add Headboard/Mattress: If using the PillowBoard, slide it between the assembled frame and the wall; it is held in place by the mattress’s weight. Finally, place your mattress on the frame.
Tip: Depending on size (twin, queen, king) the quantities differ slightly. Always check the actual inventory list for your size.
Room and Box Prep
Clear the space:
Before you pull out the bed frame pieces, clear a generous zone in your room. Move any furniture away, vacuum or sweep the floor, and ensure no tripping hazards. You’ll thank yourself when you don’t have to pause mid-assembly because the cat knocked something over.
Check floor level:
A frame like this can wobble if your floor is uneven. Use a small level (or a smartphone level app) to check the floor where the bed will sit. If you find a major slope, you might want to place a thin felt pad or adjust leg position slightly. This is something most blogs skip but it makes a difference.
Unbox and sort pieces:
Open each box one at a time. Lay out the long rails, short rails, corner legs, center rail & leg, slats, screws. Compare them to the table above.
Tip: Keep plastic bags together (one for screws) in case you need spares.
Review instructions:
Yes, I know you want to jump in. But take 2 minutes to look at the instruction sheet and note the orientation of the “U-joints” or Japanese joinery parts. The blogs by Welcome Objects and GQ mention this orientation problem. Orientation matters because if one piece is upside down you might have to detach and redo (as the GQ author experienced). So save yourself 20 minutes later.
Frame Assembly Corner by Corner
Begin with rails and first leg:
Pick a corner of the area you’ve cleared. Stand one long side rail upright, orient the “U-joint” part correctly (usually facing up or out as per sheet). Insert the first corner leg into the long rail’s joint. If one end of the leg feels too tight, slightly angle the rail to make the joint slide smoothly less force, less risk of damage.
Attach the short end rail:
Now pick up the short rail (foot or head end) and attach it to the same corner leg, forming an L-shape. Ensure the “U-joints” are facing as the instructions indicate (many skip spelling out “face the U joint upward”, so I’m highlighting it).
Move to the next corner:
Continue around: attach the next leg, then the next rail, forming the rectangle of the bed frame. Keep checking that rails are flush and joints are seated fully.
Tip: If a rail feels “off”, stop and check orientation fixing it later takes more time.
Insert the final short rail:
Once you’ve added three legs and two rails, finish with the final short rail to close the rectangle. Step back and ensure the frame sits flush on the floor not leaning or rocking.
Center Support Installation
Insert the center rail:
Pick up the center rail (lengthwise piece). Slide it into the two “horseshoes” or support brackets built into the long side rails. This rail runs under the mattress mid-line and provides extra support. In the Thuma assembly instructions I found, this step shows precisely how the center rail fits inside the existing frame.
Attach the center leg:
Using the two large screws provided, hand tighten the center leg into the underside of the center rail. This is the only hardware step (apart from slats) in the entire process. Other blogs mention “only two screws” which is a big plus.
Slats Installation
Unroll slats:
The slats will be rolled up, often with felt on the ends (for noise reduction). Unroll them gently across the frame from head to foot.
The Welcome Objects review specifically praised the felt‐wrapped slats as a nice touch.
Place first and last slats:
Place the first slat near the head side between the short rail and the “slat stop” (if present). Then unroll the entire bundle all the way to the foot. Finally, position the last slat at the foot end, again between rail and stop.
Check spacing and fit:
Make sure slats sit evenly, no large gaps. If your mattress is heavy (over ~12″ height or a topper), you may want to add a thin plywood sheet over the slats for extra support: one user did this and mentioned it improved stability.
Final Adjustments and Mattress Placement

Level check & wobble test:
Go around the bed with a small level or smartphone app. Check the frame is level side to side and front to back. Sit in each corner and the middle of the bed to see if anything shifts. If there’s a slight wobble, you may need to adjust the legs (sometimes adding a small felt or cork pad under one leg helps) or move the frame slightly on the floor.
Clean up packaging:
By now you likely have a few empty boxes, plastic bags, foam pieces. Take a moment to tidy up: recycle what you can, keep screws/bag in a safe place for future tightening (beds can settle slightly after use).
Place mattress:
Lift your mattress onto the slats. If you have a thick mattress, adjust pillows/headboard accordingly. The Welcome Objects review noted that if the mattress is taller than typical (~15″) then the low headboard/pillowboard may look too low. Once mattress is placed, give it a small push in the middle and listen/feel for stability: no creaks, no shifting.
Add bed linens and base styling:
Now the fun part: dress it up with sheets, comforter, pillows. Because the Thuma Bed Frame is minimalist, you might want to enhance with under bed lighting, side table style, or floor rug for that cozy effect.
FAQs
Q: Do I need any tools to assemble the Thuma Bed Frame?
A: No standby tools are required except your hands. The interior design uses Japanese joinery and only two screws for the center rail. Other blogs confirm this.
Q: How much time should I allocate for assembly?
A: If everything is laid out and you’ve prepped the room, around 20-40 minutes for a queen size is realistic. One author reported 20 minutes.
Q: Will this frame squeak or move over time?
A: If installed correctly and on a level floor, the frame is very stable. However, like any furniture, slight settling can happen. Periodic checking helps tighten screws if necessary.
Q: Does this work for all mattress types?
A: Yes for typical mattresses (10-12″ height) it works well. If you have an extra thick mattress (15″+), you may want to add the plywood layer or ensure slats are good. One reviewer did exactly this.
Q: What about headboard options and storage underneath?
A: The Thuma PillowBoard headboard rests against the wall (does not attach to the frame) so if you don’t want the bed right against the wall, that may be a consideration.
Q: If one piece is missing, what do I do?
A: Before starting assembly, compare your parts to the table above. If something is missing, contact Thuma support immediately with your order number and parts list they’ll arrange for replacement.
Conclusion
Setting up your Thuma Bed Frame at home doesn’t have to be a chore. With a little room prep, careful orientation of each rail and leg, and a few checks along the way, you’ll have a sleek, sturdy bed ready for restful nights. So clear your space, unpack those boxes, and let the smooth minimal lines of your new bed frame do their magic. Sleep in comfort, and wake with a smile knowing you assembled that thing like a pro (with minimal sweat).