

Home & Decor Blogs: DIY, Interior Design & Lifestyle Ideas
What Actually Happens When You Remove a Wall to Open Up Your Kitchen

The wall you’ve been looking at for months and telling yourself, “Oh, if that wall wasn’t there, the whole space would be twice as large,” might be holding you back when it comes to getting your roof done.
Not metaphorically. Literally. The ceiling above it, the floor above that, and, depending on your house, the entire structural load path from roof to foundation could be running through that single wall. Remove it without understanding what it’s doing, and you’re not renovating. You’re creating structural damage that starts with a crack in the ceiling and ends with a sagging roofline.
Let’s take a look at what’s actually happening in your walls — and what needs to occur for that open concept home to not be a big, happy wall.
How to Tell if the Wall You Want Gone Is Holding Up Your House
Not every internal wall is structural. Some are just partition framing — studs, plasterboard, nothing sitting on top of them. Those can come out in an afternoon with a reciprocating saw and a skip bin.
Load-bearing walls are different. They’re transferring weight from above — roof, upper storey, ceiling joists — down through the frame and into the foundation. Remove one without replacing it and the structure above has nowhere to send its weight. It sags. It cracks. Eventually it moves enough to cause real problems.
- The floor joist test you can do yourself. Go into your roof space or basement and look at which direction the joists run. Load-bearing walls typically run perpendicular to the joists, the joists rest on top of the wall or are supported by it along their span. If the wall runs parallel to the joists, it’s more likely a partition. More likely — not definitely. Some parallel walls still carry point loads from above, which is why this test narrows the odds but doesn’t replace an engineer’s assessment.
- Other clues: Structural walls typically stand directly above a beam, or a wall on the floor below. Vertical walls that span several storeys are nearly always load-bearing. Occasionally thicker walls (over 90mm thick) are used in the stud wall, as this may be doubled up to support heavier loads.
- What you can’t tell from looking: How much load the wall carries. A wall might be load-bearing but only supporting a lightweight ceiling with no upper storey — relatively simple to replace. Or it might be catching concentrated loads from roof trusses, water tanks, or upper-floor bathrooms with heavy tile and a full bathtub. The visual test tells you whether a wall is structural. Only an engineer’s calculation tells you how structural.

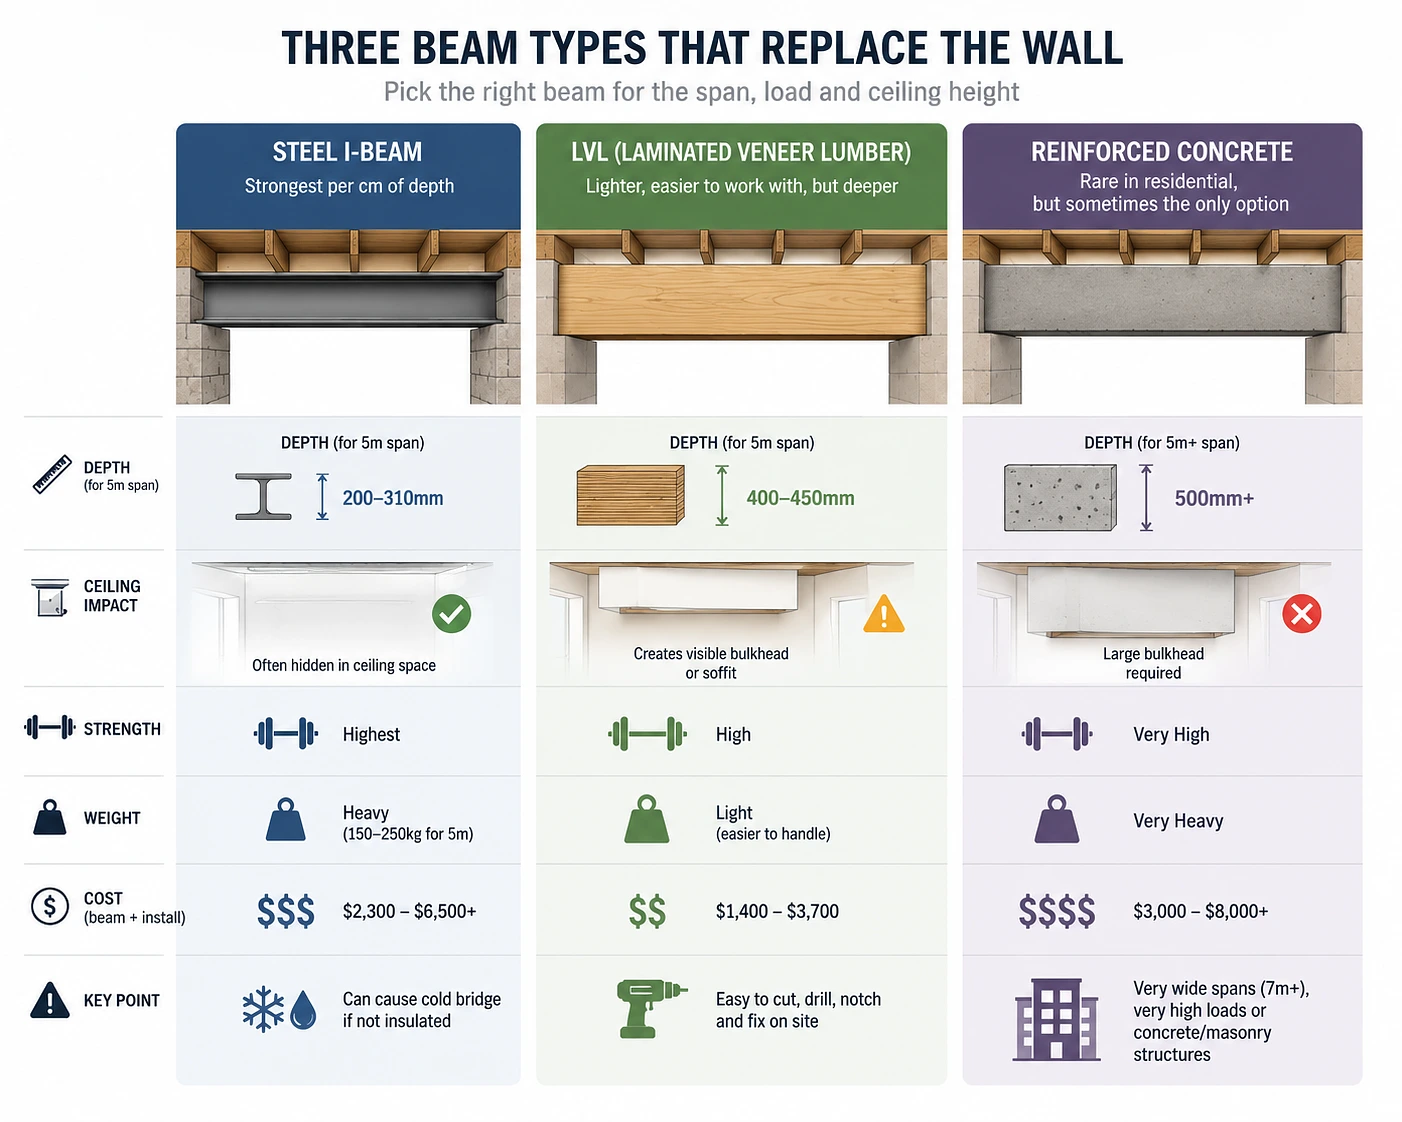
Three Beam Types That Replace the Wall — and Why Engineers Pick One Over Another
If a load bearing wall is removed, it must be replaced. That something is a beam — a horizontal structural member that is used to span an opening and takes the load laterally to posts or columns which transfer the load down to the foundation.
Beams are not created equal. The one your engineer recommends will be determined by the amount of weight you need to carry, the length of the beam you need to span, and the amount of ceiling height you are willing to sacrifice.
Steel I-Beam: The Strongest Option Per Centimetre of Depth
In addition to being the most economical, a steel universal beam (UB) can support the most load in the least depth of any other. The depth of a steel beam may be 200-310mm for a standard kitchen to living room opening (4-6 metres). The same job done by an equivalent timber beam may be 400mm+ deep.
The reason depth difference is important is that the beam is positioned at the level of the wall – so if you have enough space above your ceiling, it will be in your ceiling space, which is awesome; however, if you don’t, it will be visible through the ceiling, which isn’t so awesome. The shallower the beam, the cleaner the finish. Steel allows you to retain the height in situations where timber would require a visible bulkhead.
Cost range: Depending on size and length, $800 to $2500 for the beam. Installation costs $1,500 to $4,000 since steel is heavy – a 5m beam can weigh 150 – 250kg and requires a crane or several workers to position.
The drawback: Steel is a good conductor of heat and cold. Poorly insulated ceilings can present a ‘cold bridge’ where a line of condensation will be visible through the plasterboard underneath as a wet line in the ceiling. This can be prevented by wrapping the beam with insulation before lining over it, however, builders sometimes do not do this.
LVL (Laminated Veneer Lumber): Lighter, Easier to Work With, But Deeper
LVL is a type of engineered wood (thin layers of wood veneer glued together under pressure with the grain all in the same direction). It is more durable than solid wood, it is dimensionally stable and goes in long lengths with no knots or defects as those of natural wood.
An LVL beam will generally be 50-80% deeper than a steel beam for the same span and load. If the opening is 5 metres wide and you are looking for a 250mm steel beam, you may require an LVL beam 400-450mm wide. This additional depth is typically accompanied by a clearly visible bulkhead below the ceiling, or by boxing it in with plasterboard forming a soffit.
Cost range: $400–$1,200 for the beam. Installation costs range from $1,000 to $2,500; lighter than steel, easier to work with, but its size may cause some challenges in positioning in tight ceiling areas.
Where LVL wins: More easily manipulated on site – services can be drilled through, ends can be notched to accept bearing connections, and plasterboard can be attached directly without using furring channels. If you’re able to drill a hole through a steel I-beam on site, then you know why LVL is the builder’s choice when depth is not a requirement.
Reinforced Concrete: Rare in Residential, But Sometimes the Only Option
Concrete beams are rarely used in common house remodelling projects. They are present when the opening is extremely wide (7+ metres), the load above is extremely high (more than 2 storeys of masonry) or if the existing structure is concrete or block and a steel or timber beam cannot be fitted cleanly.
You’ll encounter this in: Brick buildings that have solid masonry walls, multi-storey apartments or buildings with concrete upper floors. The beam is precast (manufactured off-site and then lifted in) or it is cast on-site using formwork and steel reinforcement.
Cost and complexity: Much higher than steel or LVL – $3,000-$8,000+ based on size. The formwork, the curing time as well as the propping requirements make this a structural operation which does not fit into the category of one day lift beam.
The Costs Nobody Mentions Until You’re Midway Through Demo
The beam is the headline cost. But at least four other things add to the bill and most quotes don’t break them out clearly until you ask.
- Temporary propping. Before the wall comes out, the structure above it needs support. That means adjustable steel props (acrow props) positioned under the joists on both sides of the wall, sitting on solid timber spreaders to distribute the load across the floor. These stay in place until the beam is installed and bearing. If the builder skips this step or does it poorly, the ceiling can drop during removal — sometimes just millimetres, sometimes enough to crack plasterboard throughout the room.
- Making good the ceiling and floor. The wall sat on the floor and touched the ceiling. When it’s gone, you’ve got a strip of missing flooring and a line across the ceiling where the plasterboard was cut. Matching existing floorboards or tiles across a 100mm gap isn’t always possible — especially with timber floors where the original boards have aged to a different colour. Sometimes the entire floor needs sanding and refinishing. The ceiling line needs plastering, sanding, and repainting — and if the existing ceiling has a textured finish, matching it is harder than starting fresh.
- Relocating services. Walls contain things. Power points, light switches, TV cables, sometimes plumbing or gas lines. All of these need to go somewhere else before the wall comes out and get reconnected after the beam goes in. An electrician and possibly a plumber are part of this project whether you planned for them or not.
- Council permits. In most areas, a building permit and engineer’s certificate is required to remove a load-bearing wall, stating that the replacement beam is sufficient. There are also inspections performed at certain stages in some councils, such as after propping, after beam installation, before lining. The actual permit costs $200-$800 based on your location. A report and drawings from the engineer are an extra $500 to $1,500. This isn’t optional. When the house is sold later, the work is not registered and becomes the problem of the buyer and may be a deal-breaker.

When Opening Up a Wall Actually Makes the Room Worse
This isn’t what renovation shows tell you, but it happens enough to mention.
- Acoustics change dramatically. Two separate rooms have two separate sound environments. Open them up and sound travels everywhere. There is a TV in the living area that can be compared to the rangehood in the kitchen. Children who are working on their homework at the dining table hear all the conversations in the lounge. The solution is soft furnishings, rugs and curtain panels – and it’s something you must plan for. There are definite echoes of a hard-surfaced open plan area with tile floors and low furnishings.
- Heating and cooling costs increase. A closed room heats up fast with a small unit. An open-plan space combining kitchen, dining, and living might be 50–70 square metres — requiring a significantly larger HVAC system to maintain temperature. If your current split system was sized for the room as it was, it won’t cope with the room as it becomes.
- You lose wall space. Every wall you remove is wall you can’t hang art on, lean a bookshelf against, or mount a TV to. In smaller homes, this trade-off bites harder than expected. The open feel is real — but so is the sudden lack of anywhere to put things.
None of this means you shouldn’t do it. It means you should go in knowing what changes beyond the layout.
Getting the Structural Assessment Right Before Anything Else
Everything above — the beam selection, the propping, the services relocation, the permit — flows from one starting point: a structural engineer inspecting your specific wall in your specific house and calculating exactly what’s needed.
Not a builder’s opinion. Not a guess based on what worked in a similar house. An engineer’s calculation based on your span, your load, your soil conditions, and your existing framing. ProStruct specialises in exactly this — residential structural assessments where homeowners want to open up walls and need the engineering done properly before the builder starts. They handle the inspection, the calculations, the beam specification, and the council documentation.
Contact us today! if you’re at the stage where you’ve decided the wall needs to go and you need someone to tell you what has to replace it.