

Home & Decor Blogs: DIY, Interior Design & Lifestyle Ideas
Why the Overhead Light Bar Above Your Bathroom Mirror Is Almost Always Wrong
Look at almost any newly built bathroom in the last twenty years and you’ll find the same lighting setup. One horizontal light bar mounted above the mirror, sometimes paired with a recessed ceiling fixture directly overhead. It looks clean in the builder’s photos. It hits code. And it’s genuinely one of the least flattering lighting arrangements you can install in a room where people look at their own faces every morning.
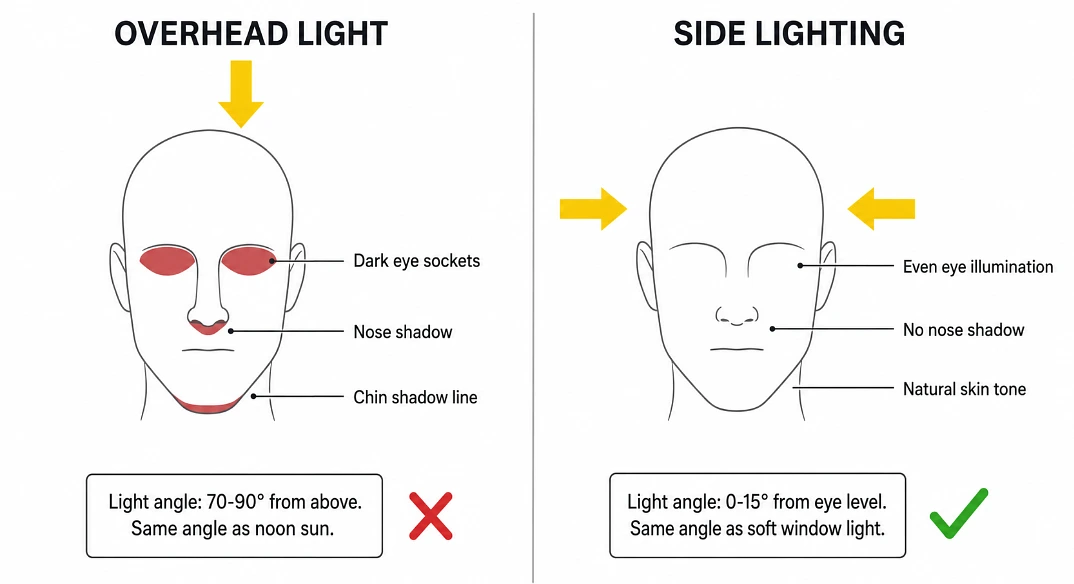
The reason has nothing to do with style preference and everything to do with basic geometry. When light comes from directly above a face, it accentuates hollows. The eye sockets go dark. The area under the nose disappears. Skin under the chin turns into a shadow line. Designers call this the raccoon eye effect, and it’s the reason so many people say their bathroom “looks fine but the light is somehow wrong.” The setup was engineered for the room, not for the person standing in front of the mirror.
This is a lighting article that treats lighting the way it deserves to be treated: not as a decorative afterthought but as the single most important functional decision in a bathroom renovation. Everything else (the vanity, the tile, the paint, the fixtures) exists to be seen, and how it gets seen depends entirely on what’s illuminating it.
The Physics of Why Overhead Fails
A bathroom mirror is used for face-based tasks. Shaving, applying makeup, checking skin, brushing teeth, doing hair. All of these require even light hitting the face from the front, ideally from both sides at eye level, so no part of the face is in shadow while another part is over-lit.
Overhead light does the opposite. Whether it’s a ceiling downlight or a horizontal bar above the mirror, the light angle is coming from above the head. That’s the same angle noon sun hits at, which is exactly the light angle no photographer would ever choose for a portrait because it makes faces look terrible. Photographers work around this problem constantly. Bathroom designers usually don’t.
The horizontal bar above the mirror is a slight improvement over pure ceiling lighting because the light source sits closer to the face, which reduces the shadow intensity. But the angle is still wrong. Light hitting the top of the head and forehead first, before wrapping down the face, is why people applying makeup often walk to a window before finishing. Natural side light from the window fixes what the bathroom lighting broke.
The correct approach uses vertical illumination from either side of the mirror. Two wall-mounted fixtures flanking the mirror at roughly eye level cast light across the face rather than down it. Shadows disappear. Skin tone reads accurately. The face looks the way it would in soft natural light rather than the way it would in an interrogation room.
The Specifications That Actually Matter
Once you commit to side lighting rather than overhead, the technical specifications determine whether the setup works or fails. These numbers matter more than the fixture style.
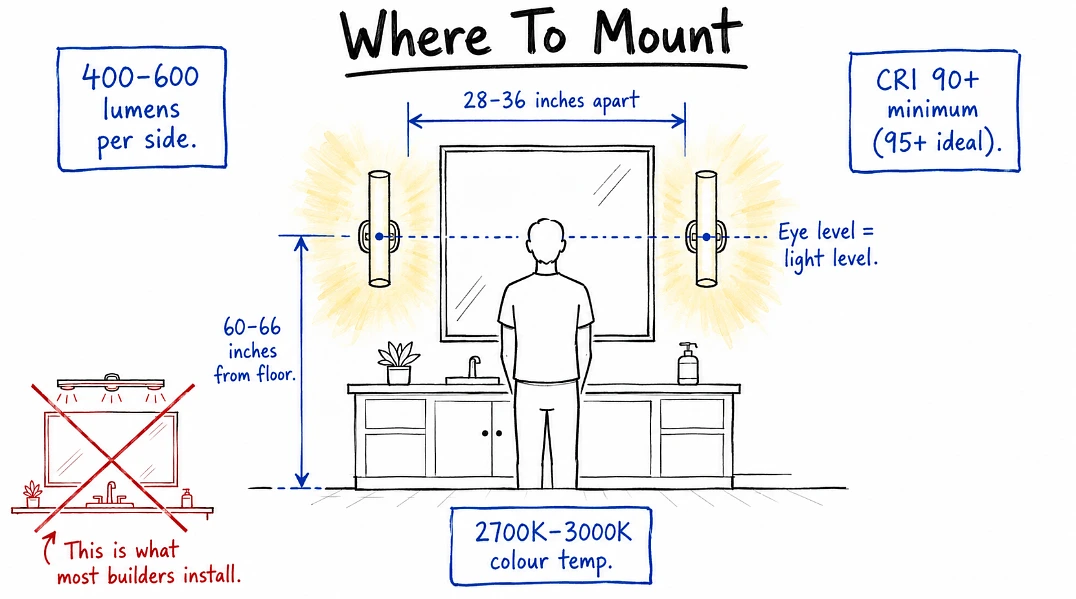
Mounting height: Center of each fixture at 60 to 66 inches from the floor. This puts the light source at approximate eye level for most adults, which is where side lighting has to hit to eliminate facial shadows. Mount too high and you recreate the overhead problem. Mount too low and you’re staring into the light source itself.
Spacing: Fixtures 28 to 36 inches apart, flanking the mirror on either side. Closer than 28 inches and the light gets compressed into the center of the face. Wider than 36 inches and the outer edges of the face fall into shadow.
Brightness: Each side fixture should output 400 to 600 lumens for typical residential bathrooms. Total vanity area lumens should land at 1,500 to 2,500 lumens across all sources. Bathrooms doubling as makeup rooms benefit from the higher end of that range.
Color Rendering Index (CRI): Minimum 90 CRI, ideally 95+. This is the specification that separates a fixture that renders skin tones accurately from one that makes everyone look like they have jaundice. Cheap LED fixtures often skip this rating entirely, which is a red flag. If the specification sheet doesn’t list CRI, assume it’s below 80 and skip the product.
Color temperature: 2700K to 3000K for evening comfort and standard grooming. Warmer than 2700K reads as amber in the mirror. Cooler than 3000K reads clinical and unflattering. Adjustable color temperature fixtures (2700K to 5000K range) let you shift toward daylight for morning makeup application while staying warm in the evening.
Damp rating: Minimum IP44 for bathroom installations. Fixtures inside a shower zone or where direct spray could reach them need wet-rated (IP65 or higher). The location matters for code compliance and for the fixture’s actual lifespan in a humid environment.
GFCI protection: Required on all bathroom lighting circuits per current electrical code. This isn’t optional and it’s why bathroom lighting installation should always involve a licensed electrician rather than a DIY approach.
Why Wall Sconces Beat Almost Every Other Option
For side lighting to work, the fixtures have to actually be wall-mounted at the correct height. This is where bathroom wall lights in vertical sconce form become the correct answer for most vanity installations. Not for style reasons. For geometric reasons. A wall sconce mounted at eye level does exactly what the physics requires: it puts a light source at the same height as the face and directs illumination horizontally across it rather than downward onto it.
The fixture material and finish become secondary considerations once the sizing and mounting are correct. Antique brass, brushed nickel, matte black, and polished chrome all of these work equally well from a lighting performance standpoint. The difference between them is aesthetic, not functional. A brushed nickel sconce mounted at 63 inches high with 90+ CRI, 3000K, and 500 lumens output performs identically to an antique brass sconce with the same specifications.
Where fixture style does matter is diffusion. A fixture with a frosted or opal diffuser produces softer, more even light than one with exposed bulbs or clear glass. Exposed Edison bulbs look beautiful in Instagram photos and cast terrible facial shadows in real bathrooms. If the fixture design shows the bulb directly, expect glare in the mirror and hot spots on the face. Frosted glass, fabric shades, and opal diffusers spread the light source across a larger area, which softens the shadows the physics is trying to eliminate.
Height flexibility also matters for the wall-mounted approach. Ceiling fixtures are fixed at whatever the ceiling height happens to be, which in an eight-foot ceiling puts the light source almost three feet above the average person’s head. Wall sconces can be positioned at the height the face actually needs, regardless of ceiling height, which is why they work equally well in a powder room with a nine-foot ceiling and a primary bathroom with a vaulted twelve-foot one.
When the Overhead Bar Actually Makes Sense
There are situations where side sconces genuinely don’t work and an overhead bar is the correct compromise. Not many, but they exist.
Bathrooms with no wall space next to the mirror. Some layouts run the mirror wall-to-wall between two side walls, or place the mirror in a corner where mounting a sconce on one side would put the fixture too close to another wall or a shower enclosure. In these cases, an overhead bar with proper specifications does an adequate job, though not the best possible one.
Wide double vanities with a single shared mirror. When one mirror spans a 60 to 72 inch double vanity, mounting sconces at both outer edges puts them too far apart to properly light either face. Two horizontal bars (one above each sink) or a very wide single overhead bar becomes the practical solution.
Small powder rooms where guests wash hands but don’t apply makeup. If the bathroom’s primary use is hand-washing and quick appearance checks rather than detailed grooming, the shadowing problem matters less. An overhead bar with a good diffuser is fine here, and the visual simplicity often works better in a small space than two flanking sconces would.
For most primary bathrooms and hall bathrooms used for daily grooming, though, the overhead-only approach is worse than the side-lit alternative, and it’s worth the electrical work to change it during a renovation.
The Layered Approach That Combines Everything
The best bathroom lighting isn’t one type or the other. It’s layered lighting that combines different sources for different tasks.
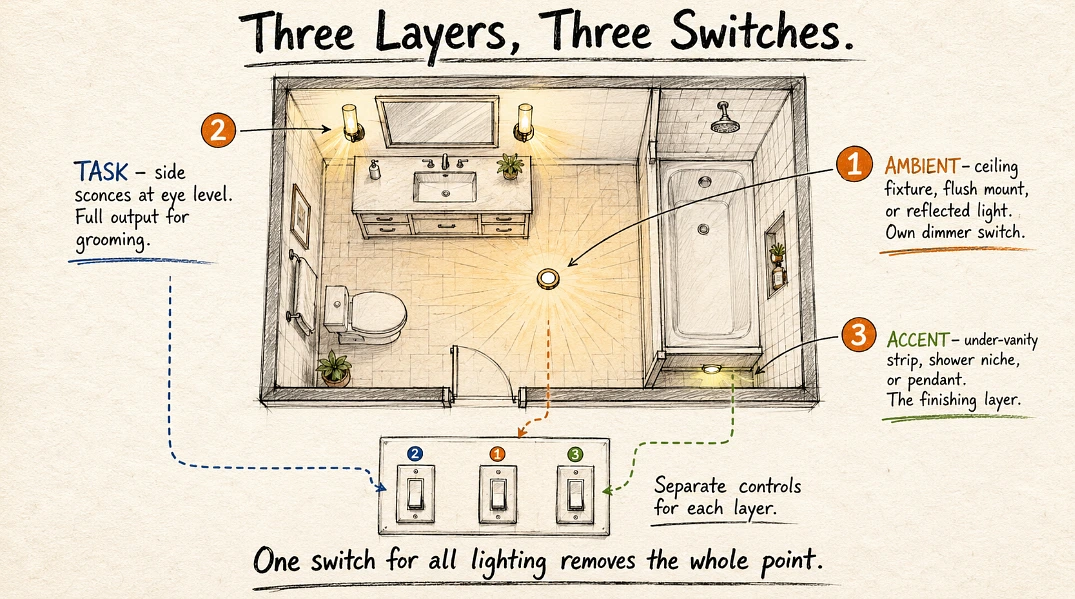
Ambient lighting handles the overall room. This can be a recessed ceiling fixture, a flush-mount, or even the reflected light from the vanity sources doing double duty in small rooms. The point is that walking into the bathroom shouldn’t require standing at the vanity to see the room.
Task lighting handles the face at the mirror. This is where the side sconces do their work. Two vertical fixtures flanking the mirror, mounted at eye level, with the specifications listed above.
Accent lighting handles the aesthetic layer. This might be a decorative pendant over a soaking tub, a strip light under a floating vanity, or a small niche light in a shower. Not required for function, but the layer that makes a bathroom feel finished rather than just functional.
Each layer runs on its own switch or dimmer. Bright morning grooming needs the sconces at full output. Evening bath time needs the ambient layer dimmed to 20 percent and the sconces off entirely. A single switch controlling all bathroom lighting removes the flexibility that makes the layering worth doing in the first place.
What the Rewire Actually Costs
The reason so many bathrooms have overhead-only lighting is that builders install what’s cheapest and simplest. One junction box centered above the mirror covers code and takes an electrician one hour to wire. Adding two additional junction boxes for side sconces requires opening the wall, running new circuit, patching drywall, and painting to match. That’s real work.
Adding two wall sconces to an existing overhead-lit bathroom typically runs $800 to $2,000 in electrical and drywall work, plus the fixture cost. The fixtures themselves range from $150 to $600 per pair for entry-level to mid-range options, or $800 to $2,000 per pair for designer brands. Total project cost for the lighting upgrade alone lands somewhere between $1,100 and $4,000 depending on how much wall opening the electrician has to do and how high-end the fixtures are.
That’s not trivial money. But it’s a fraction of what most people spend on the vanity, the tile, or the countertop, and it’s the single change that makes the whole bathroom look better in daily use rather than just in photographs. Renovation budgets that skip the lighting to spend more on stone are optimizing for the wrong thing.
Bathrooms are the room where lighting has to do the most work with the least forgiveness. Get it wrong and everything else in the room suffers, because everything else in the room gets seen through whatever the lighting is doing to it. The overhead bar is fine for a room where nobody looks at their own face. In a bathroom, it’s the wrong tool for the job.