

Home & Decor Blogs: DIY, Interior Design & Lifestyle Ideas
How To Plan A Drip Irrigation Layout For A Home Yard, From The Spigot To The Last Plant

Irrigation, irrigation, irrigation. With KEA Home it is not going to be your headache. We wrote this one the way we wish someone had written it for us, back when we were standing in the garden center aisle holding a 100 foot coil of black tubing and a bag of little emitters with no idea whether that coil would even reach the beds. This is for a house, a hose spigot on the wall, some raised beds and a border of shrubs. If you have a well pump and 5 acres of tomatoes you need a different article and probably a different website.
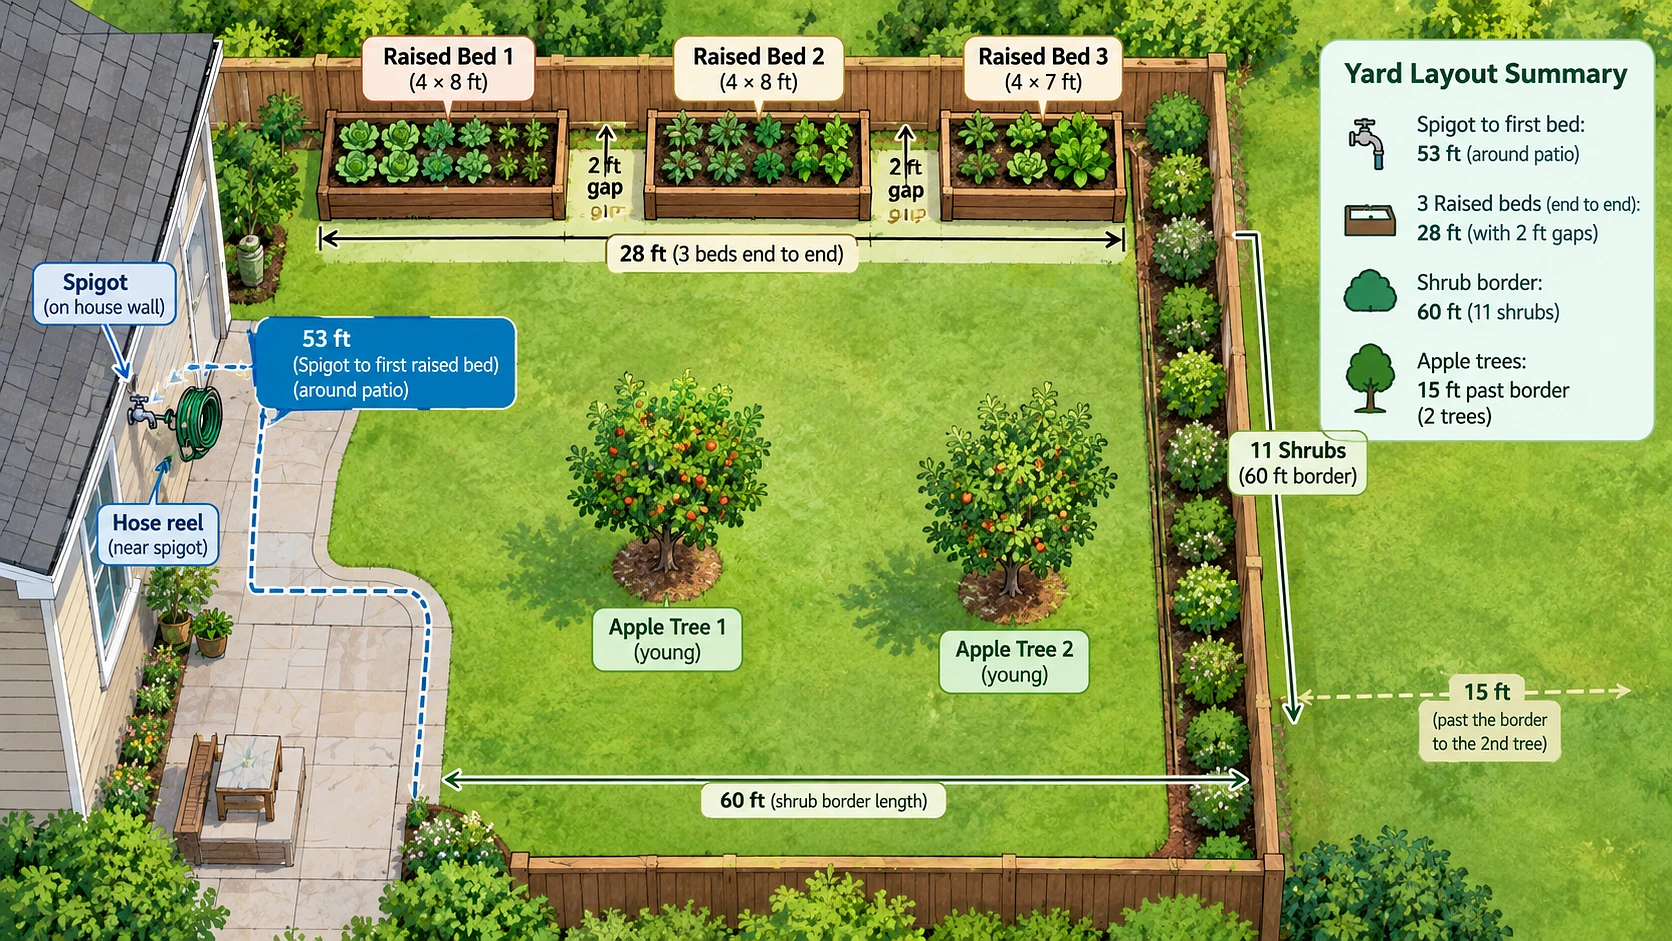
Take our yard as the one we are laying out, because it is awkward in the normal ways. 3 raised beds along the back fence, 2 of them 4 by 8 and 1 that came out 4 by 7 because the fence post was where the 8th foot wanted to be. A row of 11 shrubs down the side, since the 12th died 2 winters ago and never got replaced. 2 apple trees planted the spring before last. And the spigot on the house wall, 53 feet from the nearest bed with the hose reel bolted to the wall right beside it, which will matter in a minute.
Image needed here for reader understanding: a hand drawn plan of that yard, spigot and hose reel on the house wall, 3 raised beds along the back fence with 1 visibly shorter, 11 shrubs down the side fence, 2 small trees, in the style of a simple colored illustration and nothing like a farm diagram.
Step 1: Measure The Yard Before You Measure Anything Else
First you need a tape measure and a sheet of paper, and you need them before the tubing, because every foot you write down now is a foot of tubing you will buy in step 5 and every foot you guess is a coil you go back for on a Sunday when the store is busy. Draw the house, the spigot, the beds, the shrubs, the trees, the path and anything the tubing has to get past. Then measure the distance from the spigot to each planting area and the length of each bed and border.
On our yard that came to:
- Spigot to the first raised bed, 53 feet, going round the patio and not across it.
- The 3 beds end to end with a 2 foot gap between them, about 28 feet along the back fence.
- The shrub border, 60 feet of fence with the 11 shrubs spaced unevenly along it.
- The 2 apple trees, another 15 feet past the end of the border.
Write next to each planting area what is in it and roughly how old, because a lettuce bed and a 3 year old apple tree are going to want completely different amounts of water and that is what the next step is for.
Step 2: Split It Into Zones Before You Buy A Single Fitting
You are going to run the vegetables on 1 line and the shrubs and trees on another, and the reason is run time. Lettuce and tomatoes want a drink every couple of days and not much of one. A shrub wants a long soak twice a week, and an apple tree wants the same but more of it. Put them all on 1 timer and the lettuce is drowning by the time the apple tree has had enough.
So draw a line around the 3 beds and call that zone 1. Draw a line around the 11 shrubs and the 2 trees and call that zone 2, and yes, the trees are young enough to share a schedule with established shrubs for the next few years. If there is a spray sprinkler system already in the yard, keep drip off it, since sprays are putting down water about 10 times faster than drip and no single run time suits both.
Step 3: Go And Look At The Spigot
Before the store, 2 things at the spigot, and both take less time than reading about them.
Put a 1 gallon bucket under it, turn it on full, and count. Ours filled in 19 seconds, which is a hair over 3 gallons a minute, and 3 gallons a minute is 180 gallons an hour. That number is the ceiling for any single zone, and it is the same bucket test our garden watering guide on this site uses for a sprinkler, so if you have read that one you have already done this.
Pressure you do not need to measure. A house spigot is somewhere between 40 and 80 psi and drip parts are built for 15 to 30 psi, so at house pressure the little fittings pop off and the emitters spit instead of drip. The fix is a 25 psi regulator screwed on at the spigot, every zone, no exceptions, and it goes after the filter because the filter is what keeps the regulator’s own screen from silting up.
This is what sits on the spigot before any tubing, in the order the water meets it:
- A Y splitter, because the hose still needs a tap and the hose reel was bolted in right there.
- A battery timer, 2 outlets if you are running 2 zones from 1 spigot.
- A backflow preventer, which your water company almost certainly requires on anything that feeds a garden, and which stops the yard from ever being sucked back into the kitchen.
- A 150 mesh filter. An emitter hole is smaller than the grit in city water, and a $6 filter is cheaper than 72 blocked emitters.
- The 25 psi regulator.
- The adapter from hose thread to half inch tubing.
Image needed here for reader understanding: the parts at the spigot drawn as a row left to right, Y splitter, timer, backflow preventer, filter, 25 psi regulator, adapter, half inch tubing, each labeled.
Step 4: Add Up What Each Zone Is Going To Drink
Now the sums, done out loud, on our yard.
Zone 1, the beds. Each bed gets 3 runs of half inch dripline down its length, the tubing with a 1 gallon an hour emitter already built in every 12 inches. The 2 long beds are 8 feet, so 8 emitters a run, 24 a bed. The short bed is 7 feet, so 21. That is 69 emitters and 69 gallons an hour, and we looked at that number for a while, because it is over a third of what the spigot can give, and it is fine, it is only more than a bed of lettuce sounds like it should need.
Zone 2, the border and the trees. Each shrub gets 2 button drippers at 1 gallon an hour, so 22 for the 11 shrubs. Each apple tree gets 4 drippers at 2 gallons an hour on a ring round the trunk, so 16 for the pair. 38 gallons an hour for the whole zone, which is nothing, and it is the zone that will run longest.
Both zones sit under the 180 the spigot gives, and both sit under what the tubing itself can carry, which is the number in the next step. A zone that comes out over either gets split in 2 before anything is bought. A bigger yard is usually 3 or 4 zones for that reason alone.
Step 5: Draw The Route, Then Buy The Tubing To Fit It
There are 2 sizes of tubing on a home yard and they do different jobs. The half inch line does the distance, from the spigot to the beds and along the border, and it is Polyethylene tubing for drip irrigation sold in 100 and 500 foot coils, black, and stiff until it has sat in the sun for an hour. The quarter inch line, which the trade calls spaghetti tubing and which we are going to call spaghetti from here on, taps off the half inch line and runs the last few feet to a single shrub or tree. Dripline is half inch tubing with the emitters already inside it, and it is what the beds get.
The limits on those 2 sizes decide the whole route, and we pasted them straight off a supplier’s own FAQ page so you can see we did not make them up:
¼” tubing maximum flow capacity is 15 GPH (gallons per hour). ½” tubing maximum flow capacity is 150 GPH. ¼” tubing maximum run length is 50′. ½” tubing maximum run length is 200′.
Other makers put the half inch at 200 or even 240 gallons an hour and the quarter inch at 30 feet, so the safe numbers to plan against are the ones in the table:
| Tubing | Carries | Runs | On our yard |
| Half inch poly | About 200 gallons an hour | About 200 feet before the far end goes weak | Spigot to the beds, the border run, the bed rows as dripline |
| Quarter inch spaghetti | About 30 gallons an hour | 30 feet at most, and 15 to 20 is kinder to the last plant | Off the half inch line to each shrub and each tree ring |
Now draw the route on the plan from the spigot outward, along the fence and behind the patio and not across a path anyone walks or a strip anyone edges with a string trimmer, and measure it. Ours came out like this. Zone 1 is 53 feet from the spigot to the first bed, 28 feet linking the 3 beds, and 3 runs of dripline in each, 8 plus 8 plus 7 times 3, which is 69 feet. About 150 feet of half inch in the zone, under the 200. Zone 2 is 60 feet along the border and 15 more out to the trees, 75 feet of half inch, and a piece of spaghetti of never more than 8 feet from the line to each shrub and each tree ring.
Image needed here for reader understanding: a diagram of the half inch line running along the fence with short quarter inch spaghetti branches out to individual shrubs, with the 200 foot and 30 foot limits marked.
Can spaghetti do a whole bed on its own? People try, because the coil is cheaper. It carries 30 emitters and goes 30 feet, and 30 feet is 1 side of 1 bed, and the plants at the far end of a long spaghetti run get a dribble while the near ones sit in a puddle. So half inch for the distance and spaghetti for the last step, and never the other way round.
Step 6: Lay It Loose, Flush It, Run It, Then Bury It
Unroll everything along the drawn route and leave it lying there through an afternoon of sun, which takes the coil out of it and makes it lie flat. Do not cut a single piece to length yet. The plan missed a root somewhere, or the edging stone, or the fact that the hose reel door swings out across the route, and the tubing will find it now while it is still cheap to move.
Then the fittings. Square cuts, push fittings that match the tubing you bought and not the tubing you thought you bought, and lines that already lie next to each other before the fitting goes on, because a fitting that was used to drag 2 lines together is the one that pulls apart in the second summer. Leave the far end of every run open.
Turn the water on for a few minutes with the ends open. Grass, dirt, the offcuts from the cutter, all of it went in while you were laying it and all of it has to come out before the end caps go on, since an emitter hole is smaller than any of it. A zone with 3 branches needs 3 ends open, opening 1 does nothing for the other 2.
End caps on, then run the zone for an hour and walk it:
- Every emitter dripping and every fitting dry.
- The very last emitter on the longest run dripping the same as the first, which is the 200 foot limit showing you it held.
- After the hour, a finger in the soil beside an emitter. Wet 4 to 6 inches down and a hand’s width across in a bed, wider under a shrub.
If the far end is weak, the fix is a shorter run or a split zone. It is never turning the pressure up, because higher pressure pops the fittings long before it reaches the far end. If the soil is wet an inch down and dry under that, the run was too short. If it is pooling on the surface, the ground takes water slower than the emitter gives it, so the same minutes get split into 2 runs a few hours apart.
Then stakes every few feet, a photo of the whole layout on your phone before the mulch goes on, since the plan on paper and the tubing under 3 inches of bark will not match by spring and the photo will, and then the mulch.
Our first schedule was 45 minutes, 3 mornings a week on the beds, which puts about 3 quarters of a gallon at each emitter, and 1 hour twice a week on the border and trees, 2 gallons at each shrub and 8 at each tree. Then a week of fingers in the soil and the minutes moved from there.
What You Will Be Choosing Between In The Aisle
The 6 steps get the route right. The aisle is where the parts go wrong, and there are 4 places it happens.
Button Drippers Or Dripline
Dripline for anything in a row or a block. Beds, a strawberry patch, a hedge. The emitters are already in it every 12 inches and you cannot put them in the wrong place. Button drippers, the little emitters you push into the half inch line wherever a plant is, for anything on its own, a shrub, a tree, a big pot. Most yards want both, and ours is dripline in the beds and buttons on the border.
Half Inch Or Spaghetti
Half inch for every run over 30 feet or over 30 emitters, which is every run from the spigot and every border. Spaghetti only for the last few feet to 1 plant or to pots. The cheaper coil of spaghetti looks like it would do a whole bed and the far end of that bed will be dry by July.
Pressure Compensating Or Plain
A plain emitter gives more at the start of a run than at the end and more at the bottom of a slope than at the top. A pressure compensating one gives the same everywhere and costs a few cents more each. Flat yard, short runs, plain is fine. Any slope, or a run near the 200 foot mark, and the compensating ones are the difference between an even bed and a dry corner you keep blaming on the plants.
Timer Or Your Own Memory
Meta Boxes
Use up and down arrow keys to resize the meta box pane.
A battery timer costs about what a bag of decent potting mix costs and it is the part that makes the 45 minutes on 3 mornings happen on the mornings when no one remembers. With 2 zones on 1 spigot you want the 2 outlet timer, which runs them one after the other, because both at once is 107 gallons an hour down 1 half inch line and the far beds would feel it. By hand works for a single zone and a person who is up at 6. For everyone else the timer is the last part on the list and the first one to earn its price.
 Decor & Improvement Accessories