

Home & Decor Blogs: DIY, Interior Design & Lifestyle Ideas
7 Kitchen Cabinet Upgrades That Stop You Reaching Into the Back of Everything


Nearly every storage complaint in a kitchen turns out to be an access complaint. The stuff is in there. You just cannot get at it without shifting three other things first
A kitchen can be full of cabinets and still feel like it has nowhere to put anything, because storage volume and storage access are two completely different measurements and only one of them shows up on a floor plan.
This is about cabinet interiors and hardware. Not layouts, not islands, not appliances, because those are the expensive decisions and these are the ones you notice on a Tuesday evening.
Every upgrade below takes a step out of something you repeat daily, and each one works for a mechanical reason rather than a decorative one. The numbers that matter are in with them.
The Seven Upgrades
Find whatever irritates you most, then look at what it takes to stop it.
| The upgrade | What it fixes | Why it works | Effort | Real cost |
|---|---|---|---|---|
| Deep drawers below | Reaching blind into the back of a cabinet | Storage comes to you instead of you going into it | Design stage | Highest of the seven |
| Pull out shelves | Deep cabinets you cannot see into | Same principle, retrofitted | An afternoon each | Moderate |
| Vertical tray dividers | Trays stacked on top of each other | Removes the stack, so nothing is underneath anything | An hour | Low |
| Corner mechanism | A blind corner no one reaches into | Brings contents to the opening | Design stage | Moderate to high |
| Pull out bin | Floor space and steps between board and bin | Cuts the walk during prep | Design stage | Moderate |
| Better hardware | Grip, slamming, worn hinges | The part your hand touches most | A weekend | Low to moderate |
| Under cabinet lighting | Chopping in your own shadow | Lights the counter rather than the room | A day, wired earlier | Low |
1. Swap Lower Shelves For Deep Drawers
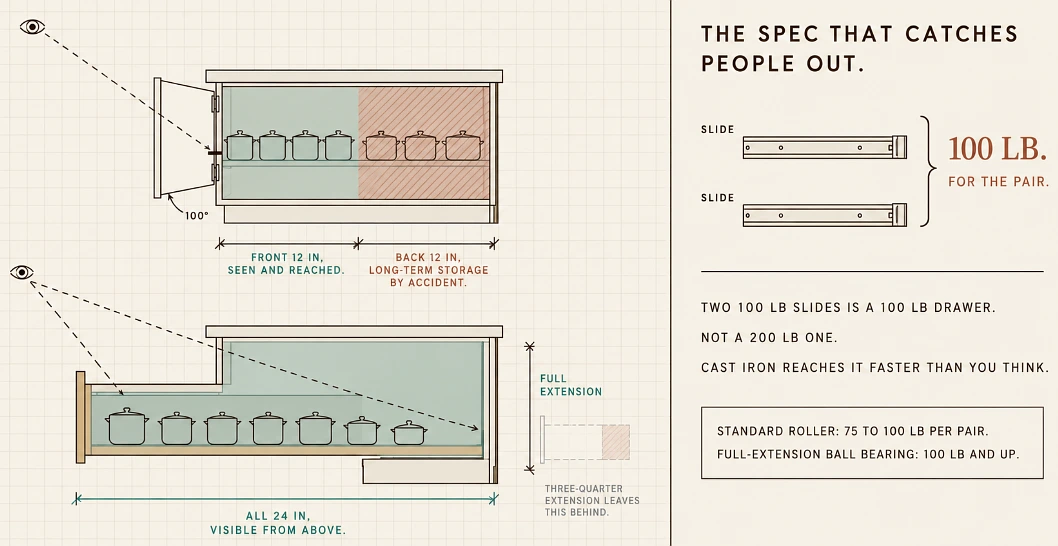
Base cabinets with doors and fixed shelves all fail the same way, and the reason explains most of what follows.
A fixed shelf inside a 24 inch deep cabinet means the back 12 inches are behind whatever is in the front 12 inches. You cannot see into that zone from standing height, and you cannot reach it without kneeling and moving the front row first. So the back half of every base cabinet in the kitchen quietly becomes long term storage regardless of what you intended to keep there.
Drawers invert the geometry. The storage travels out to you, so the entire depth is visible from above and reachable without bending, and the back of the drawer is as usable as the front.
Put them nearest the cooktop. That is where the heavy things live and where you grab most often, so pans, colanders, mixing bowls, food containers. A shallower drawer above for utensils and measuring tools keeps the light things off the floor of the deep one.
The slide is the spec to check, and it catches people out. Standard full extension slides carry 75 to 100 pounds, and that rating covers the pair rather than each slide, so two 100 pound slides is a 100 pound drawer and not a 200 pound one. Fill a deep drawer with cast iron and you are closer to that limit than you think.
Full extension matters for the same reason drawers matter at all. A three quarter extension slide leaves roughly the last quarter of the drawer inside the cabinet, which puts you straight back into reaching blind for the thing at the back.
If the kitchen is being planned around wooden kitchen cabinets from RTA Wood Cabinets, decide which bases become drawers before the cabinet schedule is finalised, because a drawer base is a different box with different hardware, and it changes how the doors and appliances either side of it behave.
2. Use Pull Out Shelves Where Drawers Will Not Work
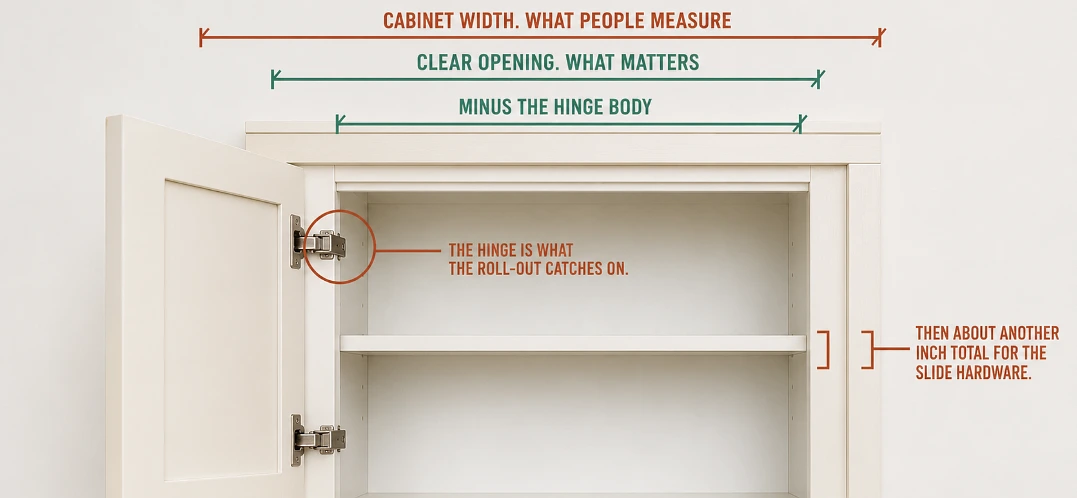
Not every cabinet is worth replacing, and a roll out gets you most of the benefit of a drawer inside the box you already own.
The mechanism is the same idea. A shelf on full extension slides that brings the contents clear of the cabinet, so a deep pantry base or a corner cupboard stops being a cave.
They earn their place with heavy or awkward things. Small appliances, baking supplies, cleaning products, bulk pantry staples. Anything you currently lift out to get at something else.
Measure the clear opening, not the cabinet width, and this is the single most common ordering mistake. The clear opening is the actual gap between whatever protrudes into it, so face frame edges, hinge bodies, or a door that only opens to 100 degrees. On a face frame cabinet that can be an inch and a half narrower than the box.
Then take about another inch off for the slide mechanism itself, since the hardware sits between the shelf and the cabinet wall on both sides.
A roll out that fits the box on paper and catches a hinge in practice is a returned roll out, and the return is the easy version. The hard version is the one you force in and then live with.
3. Store Trays And Boards On Edge
This costs almost nothing and fixes something out of all proportion to the price, which is why it is on the list.
Baking sheets, chopping boards, cooling racks and serving trays are all thin. Individually they take up no space at all. The problem is that flat items stack, and a stack means the item you want is underneath the ones you do not, every single time, because the one you use most ends up at the bottom through pure probability.
Vertical dividers remove the stack. Everything stands on edge, everything is visible from the front, and nothing is on top of anything else.
A narrow base cabinet beside the oven is the natural home, since that is where trays are used and where a 9 to 12 inch cabinet is often already sitting doing very little. The gap above a wall oven and the filler beside a fridge both work too.
Choose adjustable dividers over fixed slots. Tray collections change, you buy a wider board, you inherit a roasting tin, and fixed slots that suited last year’s collection are just a different kind of stack.
Leave height above them as well. If a tray cannot come out vertically without scraping the shelf overhead, the divider has moved the problem rather than solved it.
4. Make The Corner Cabinet Earn Its Space
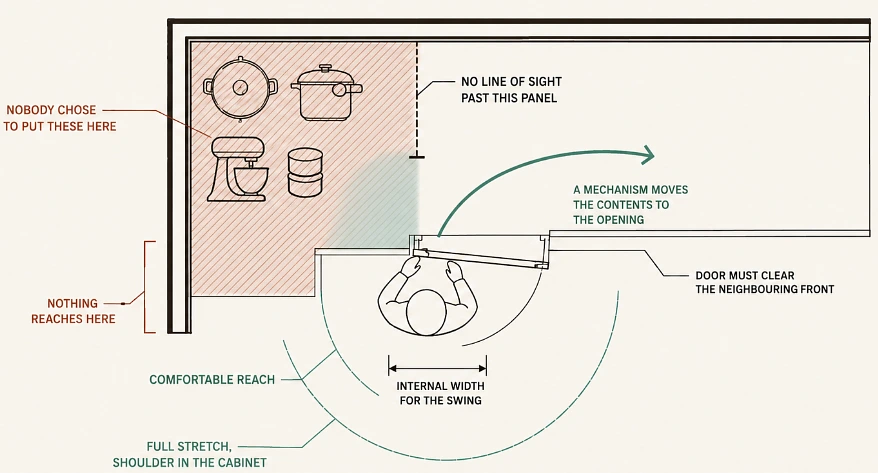
A blind corner holds more than any other cabinet in the kitchen and gives you the worst access in the house. Both of those come down to shape rather than size.
The cabinet extends sideways behind the adjacent run, so a section of it sits at right angles to the door opening. There is no line of sight into that section and no straight path to it. To reach the back left of a blind corner you are on the floor with a shoulder in the cabinet.
Which is why corners fill up with equipment used twice a year. No one decided to store the pressure cooker there. It ended up there because putting things in is easy and getting them out is not.
Rotating shelves, kidney trays and swing out systems all solve the same problem in different ways, by moving the contents to the opening rather than sending you in after them.
Plan it before the run is installed, because the mechanism has requirements the cabinet has to meet. Internal dimensions for the swing, hinge clearance so the door opens far enough, and a door path that does not collide with the appliance handle or drawer front next to it.
Adjusting a cabinet width or adding a filler at design stage costs almost nothing. Retrofitting hardware into a corner after the countertop is down means working around a fixed opening you can no longer change.
5. Put The Bin In A Pull Out
This one is about walking distance, which sounds like nothing until you count the trips.
Prep involves a constant back and forth between board and bin, so peelings, trimmings, packaging, and every one of those trips is a turn away from the counter. A freestanding bin adds steps to all of them and takes floor space in a room that never has enough.
A pull out puts the bin behind a cabinet front, immediately below or beside the prep surface, and gives the floor back.
Where it sits matters more than how it looks. A beautifully integrated bin at the wrong end of the kitchen loses to an ugly one beside the board every time, because you will keep using the ugly one.
What to check before ordering:
- Bin height against the opening, since a 50 litre bin needs more clearance than most people allow for
- Slide capacity, because a full bin of glass and food waste is heavy and this is where cheap slides fail first
- Cabinet width, as twin bins for waste and recycling need considerably more than a single
- Plumbing, if the sink base is under consideration
That last one deserves the warning. Sink bases look like the obvious location and frequently are not, because the drain line, the trap, a disposal unit, a water filter and the supply pipes all occupy exactly the volume a bin wants, and what remains is rarely bin shaped.
6. Buy Hardware For The Hand, Not The Photo
Handles, hinges and slides are the only parts of a kitchen you actually operate, dozens of times a day, for as long as you own the house. Most people pick them off a photograph.
The mistake that causes the most regret is grip against load. A deep pot drawer needs a pull you can wrap fingers around, because your hand is supplying the force to move maybe 60 pounds of cast iron on a slide that resists at first. A small knob on that drawer puts all of it through your fingertips.
Doors are the opposite case. A hinged door needs almost nothing, since the hinge does the work and you are only guiding it, which is why knobs are fine on doors and wrong on heavy drawers.
Height matters on tall units. A pantry door handle placed where it looks balanced can sit where your wrist has to twist to use it, and you will notice that every day for a decade.
Soft close hinges and slides are worth the extra for a mechanical reason as much as a quiet one. They stop the door or drawer arriving at full speed, which is what loosens hinge screws and wears drawer fronts over years of use.
Test one before you drill the rest. Fit a single handle to a real door and a real drawer, load the drawer properly, and open it twenty times. Twenty is roughly a day of normal use and it tells you more than any showroom.
And check the wall. A run sitting tight against a side wall may need a filler so the handle or the drawer front can clear the finished surface, which is a two inch decision at design stage and an expensive one afterwards.
7. Light The Counter, Not The Ceiling
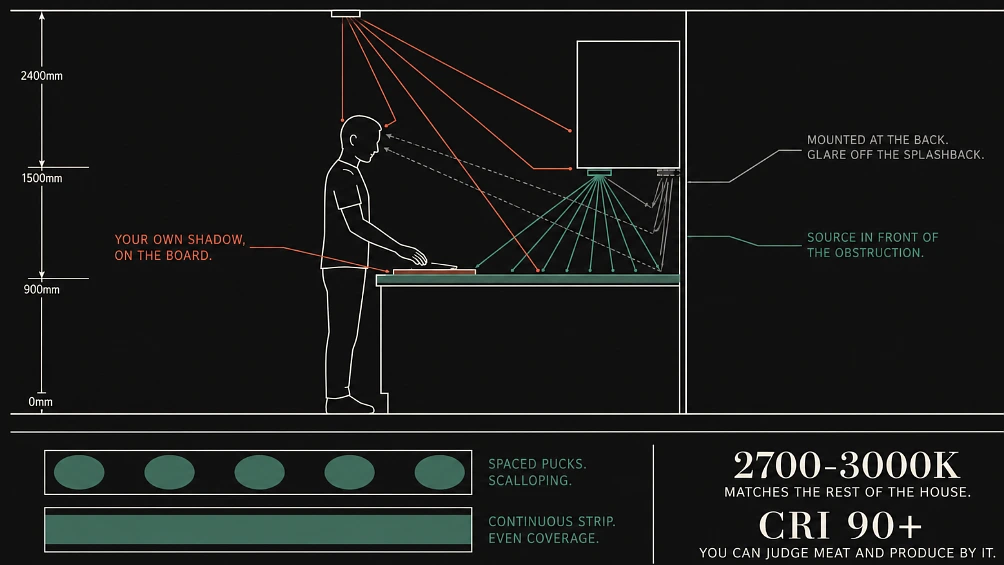
Kitchens feel badly lit despite having plenty of light, and it is geometry again.
Ceiling fixtures sit behind you when you face a counter, so your upper cabinets stand between the bulb and the worktop and your own body blocks whatever gets past them. The room is bright. The surface you are cutting on is in shadow.
Under cabinet lighting solves it by putting the source in front of and below the obstruction, lighting the working plane directly.
Continuous linear strips beat spaced puck lights, because pucks throw pools of light with dark gaps between them, so you get scalloping along the counter and end up chopping in one of the dark bits.
Colour temperature at 2700K to 3000K keeps it consistent with the rest of the house, and CRI 90 or above matters more in a kitchen than anywhere else, since low CRI light makes it genuinely hard to judge whether meat is cooked or produce has turned.
Mount the strip toward the front edge of the cabinet underside rather than at the back. Set it at the back and the light hits the backsplash first and reflects into your eyes, particularly with gloss tile.
For a renovation, decide wiring and driver locations before the backsplash goes on. Retrofitting afterwards means visible cable, extra holes, or removing a finish you have just paid for, and electrical work should go to somebody qualified where local rules require it.
 Decor & Improvement Accessories