

Home & Decor Blogs: DIY, Interior Design & Lifestyle Ideas
Wall-Hung Bathroom Vanities in Apartments: What the Wall Has to Hold and What Goes Wrong When It Can’t

A wall-hung bathroom vanity is a cabinet mounted directly to the wall with no legs on the floor. The floor stays visible underneath, cleaning is easier, and the room reads as more open. That is the appeal, and it is real.
But the part that determines whether it actually works in the long term is not the cabinet — it is the wall. A fully loaded wall-hung vanity with stone or composite top, ceramic basin, water in the trap and drawers full of toiletries typically weighs 60 to 100kg or more (higher with natural stone), all hanging from fixings drilled into whatever is behind your tiles.
Solid Walls vs Stud Walls: This Decides Everything
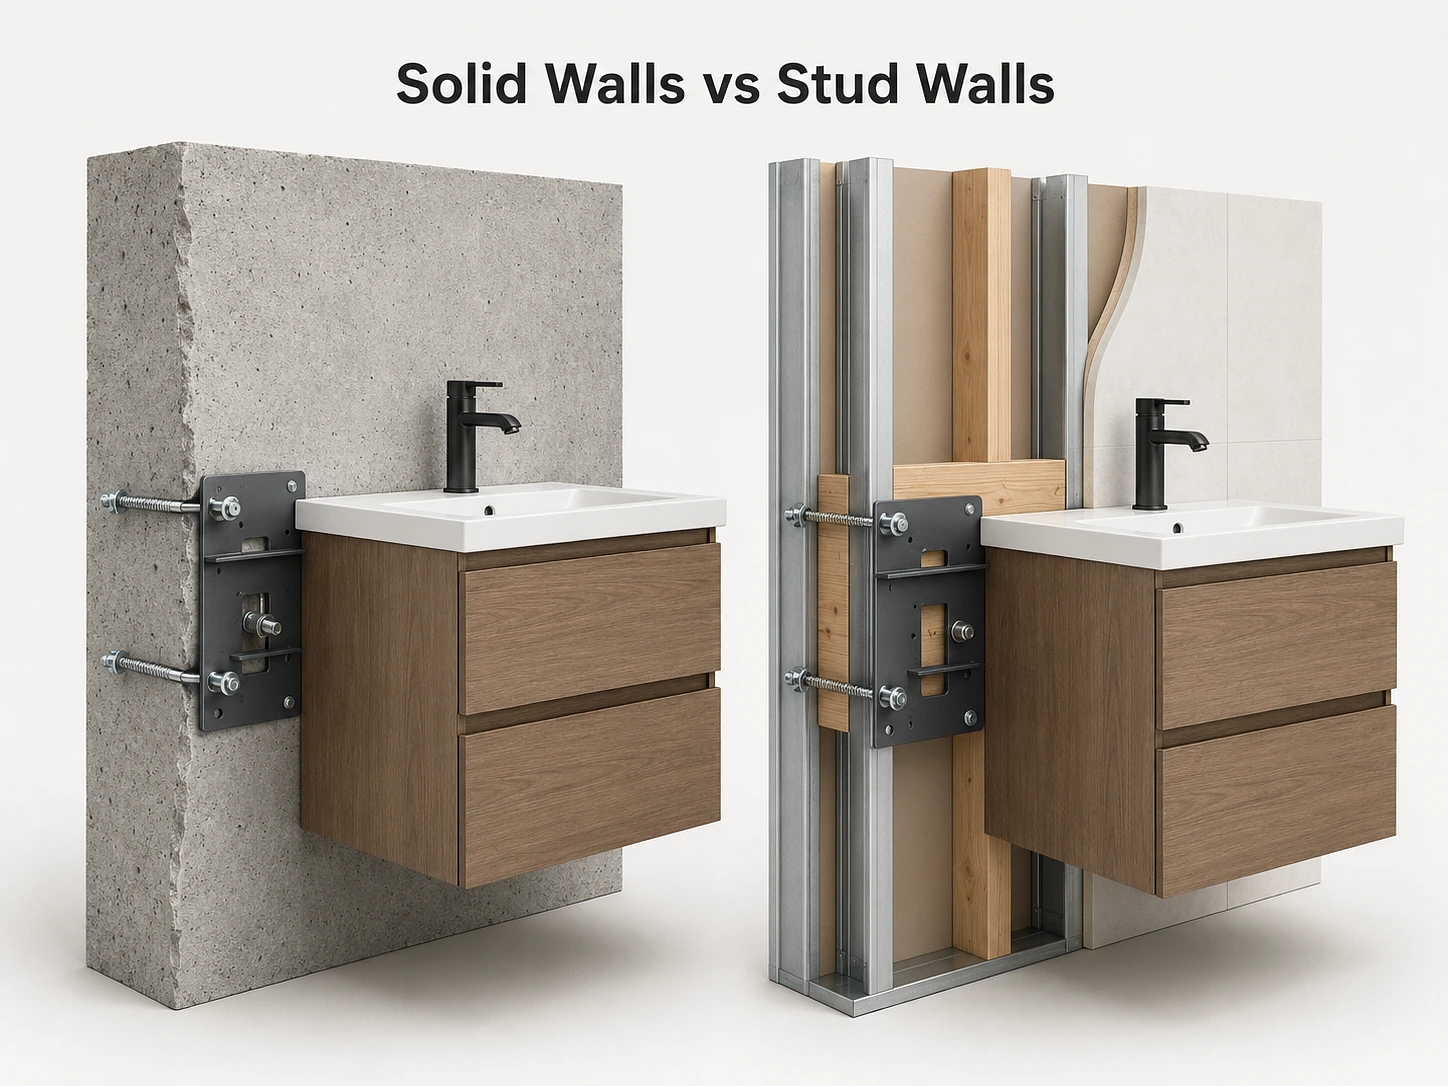
Concrete or masonry walls — straightforward. A pair of heavy-duty expansion bolts rated to 50kg each holds a wall-hung vanity comfortably with margin. Drill, anchor, mount the bracket, hang the cabinet. Most wall-hung bathroom vanity installation guide resources assume this scenario.
Steel or timber stud walls — the plasterboard alone cannot hold the weight. You need a horizontal timber nogging (cross-brace between studs) installed at the exact mounting height before the plasterboard goes on. That nogging distributes load across two or more studs instead of concentrating it on two fixing points.
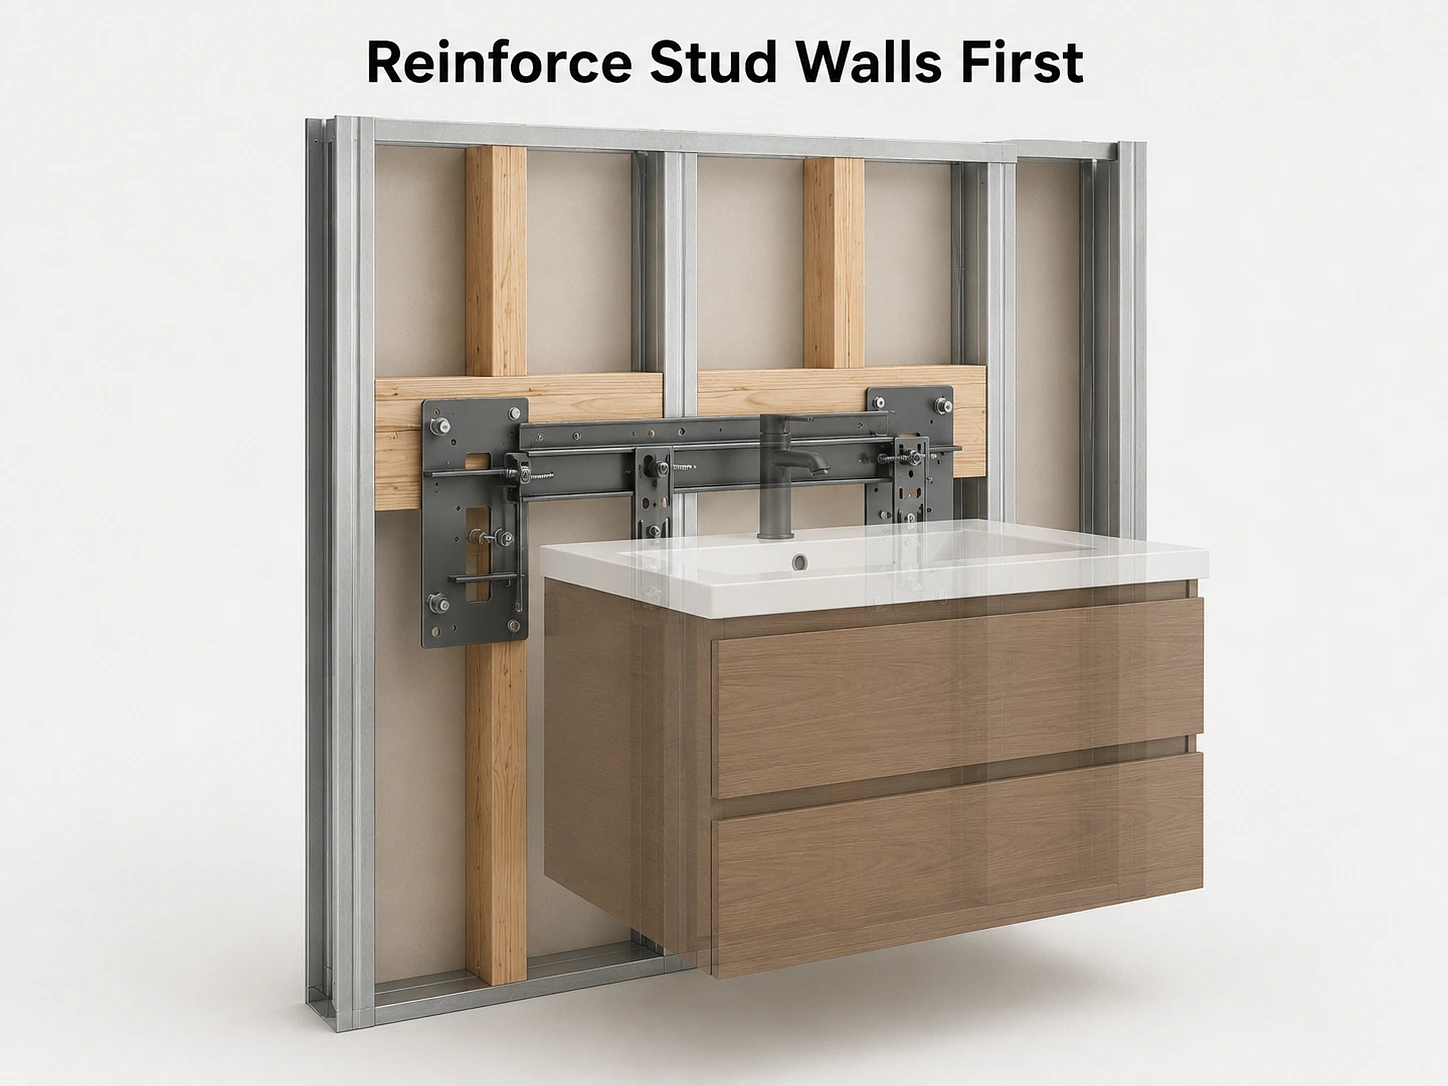
The timing problem: nogging goes in during framing, before plasterboard and waterproofing. If the vanity selection happens after walls are lined and tiled, you are either opening up a finished wall to add reinforcement or relying on toggle bolts through plasterboard — fine for a 15kg mirror, not for a 70 to 100+kg vanity that someone leans on daily.

Mounting Height: What Works and What Doesn’t

Standard is 850mm from finished floor to countertop, though some regions now favour 850 to 900mm or higher comfort heights. For most adults between 160 and 180cm tall, that puts your hands naturally at basin height and leaves enough clearance underneath to mop.
Where 850mm goes wrong in apartments:
- Underfloor heating with raised screed. The finished floor sits higher than the slab. A vanity mounted at 850mm from the slab ends up at 810–820mm from the finished floor, which feels noticeably low.
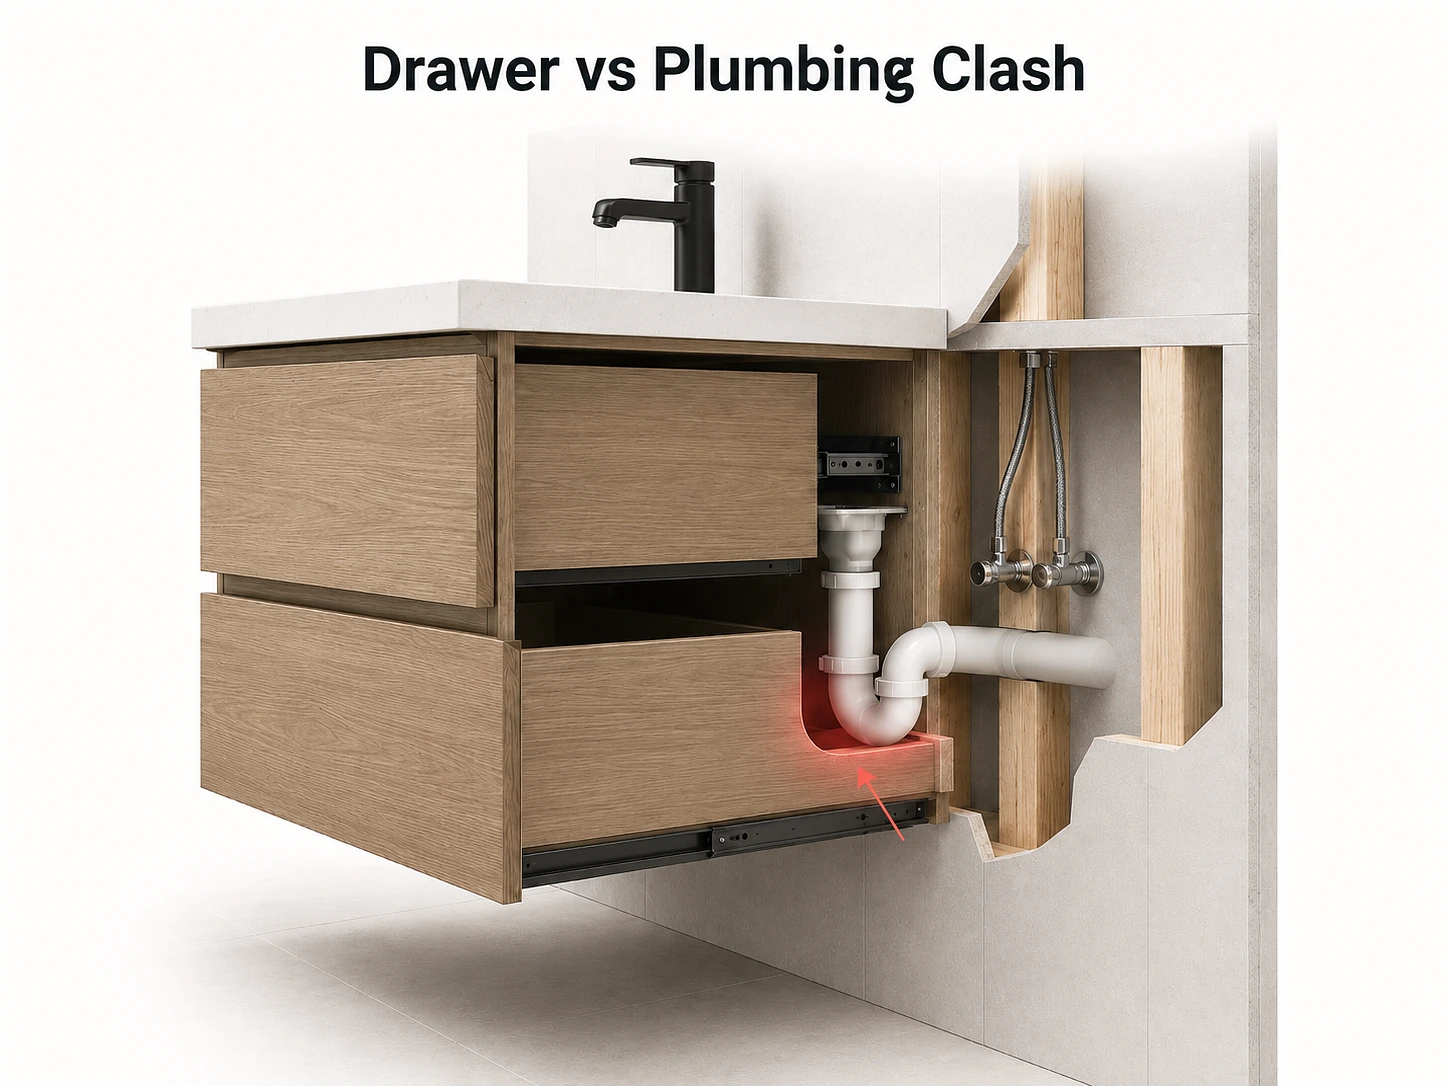
- Deep drawers with plumbing behind. If the P-trap or supply valves sit behind the back panel, mounting too low means the bottom drawer fouls against the pipework. Either lose the drawer depth or mount 50mm higher.
- Measurement reference error. Installers sometimes measure from the slab instead of the finished floor level. Different trades working different days, different reference points, vanity ends up at the wrong height.
The Plumbing Coordination That Gets Missed
This is the most common failure point on apartment fit-outs, and it has nothing to do with the vanity itself. Wall-hung vanities hide plumbing behind the cabinet, which looks clean but means every pipe has to exit the wall within a very specific zone.
What has to be coordinated before tiling:
- Drain centre position — horizontal and vertical, relative to the vanity’s internal layout. Too far left or right, and the basin waste needs an awkward offset that restricts flow.
- Hot and cold supply heights — must land inside the cabinet, above the bottom drawer, but below the countertop line.
- Shut-off valve positions — accessible without removing drawers. Maintenance will happen eventually.
- LED mirror junction box — needs to sit behind the mirror at the right height, not behind the vanity, where it becomes inaccessible.
The rough-in plumbing happens months before the vanity is selected. If the vanity changes during interior design — wider cabinet, different basin, single instead of double — the rough-in no longer aligns. Miss this, and you are cutting tiles, patching, waterproofing, or living with visible pipework that was supposed to be hidden.
Stone Countertops: The Weight People Don’t Calculate

On a floor-standing vanity, the floor carries the stone weight. On a wall-hung vanity, that weight adds to the wall load.
Weight per square metre at 20mm thickness:
- Natural marble: 50–55 kg/m².
- Engineered quartz: 42–48 kg/m².
- Solid surface (polyester/acrylic resin): 20–30 kg/m².
- Thin porcelain/sintered stone (6–12mm): 15–25 kg/m² — increasingly popular for floating vanities as a lower-load alternative.
A 1200mm x 500mm marble countertop weighs roughly 30 to 33kg for the slab alone, before basin, tap, and cabinet weight are added. Manageable on a reinforced wall, a lot to ask of a stud wall with no nogging.
When does each option make sense?
- Concrete/masonry wall: stone works, the wall can take it.
- Reinforced stud wall (nogging + verified fixings): stone works, but confirm fixing capacity and total load with the builder first.
- Unreinforced stud wall: solid surface composites or thin porcelain/sintered stone alternatives give a similar clean-line result at significantly lower weight, without the structural risk.
The visual difference between quality engineered solid surface or thin porcelain and natural stone is often smaller than expected in a compact apartment bathroom, where you are looking at a 600 to 1200mm slab, not a full kitchen island. The weight difference, however, can be the difference between a secure installation and one that gradually loosens over time.
Repeating the Same Vanity Across Fifty Apartments
One well-installed vanity in a display apartment is easy. Replicating it across forty or sixty units is where things drift — not because the design is wrong, but because coordination between trades has too many places to slip.
Small differences compound. The plumber on level three positions the drain 30mm left of where the level seven plumber does. One floor’s tiler centres the tile layout on the vanity, another starts from the corner and the vanity lands off-grid. Vanities arrive in two batches, and the colour match is close but not identical under bathroom lighting.
A reliable bathroom vanity factory manages production consistency — same finishes, same edge profiles, same hardware across every unit. Room-by-room labelling helps installers match the right vanity to the right bathroom. But factory consistency falls apart without site sequencing.
The installation sequence that works on multi-unit projects:
- Plumbing and electrical rough-in coordinated with the actual vanity dimensions.
- Tiling completed with vanity fixing height marked on the wall.
- Vanity brackets installed before final tile inspection, so adjustments happen while the tiler is still on site.
- Vanity, basin, and countertop installed as one assembly — not cabinet first and stone top days later by a different trade.
- LED mirror mounted last, after the vanity is level and the electrical is live for testing.
Skipping any step means rework in a tiled, waterproofed bathroom — and that means potentially cutting into a membrane that then needs recertification.
The difference between a wall-hung vanity that looks good on handover day and one that still works three years later usually comes down to what happened inside the wall before anyone chose a finish colour. The wall structure, the plumbing rough-in, the reinforcement — all invisible by the time the bathroom is done, which is exactly why it gets skipped and exactly why it shouldn’t be.